
So, you like to knit or crochet your own sweaters, but you have a big bust?
This probably also means you are sick of garment patterns that hang off your boobs like a tent?
I have an easy sweater adjustment solution that decreases the fabric after your full bust, banishing the tent jumper forever more.
This is a not refined solution based on a million body measurements. This is an alteration solution based on three simple measurements, a little bit of maths and absolutely no bust darts or short row shaping!
Whether you are knitting or crocheting a sweater, the same approach to bust decreases can be used.
Here’s what I cover in my bust adjustment method:
- Before you measure, get your bra right!
- What about crochet garments?
- How and where to measure your bust
- What do the measurements mean?
- How to calculate how many stitches to decrease in a top-down sweater
- How to calculate how many stitches to increase in a bottom-up sweater
- Where to decrease/ increase in a round
- Troubleshooting
1 – Before you Measure, Get Your Bra Right!
I honestly hadn’t thought about this until I went to measure myself for these photos. Take a look…

The bra that you wear when you take measurements really matters. My bust circumference grew by 5cm/ 2″ when I measured in my good bra rather than my sports bra. That’s the same amount of positive ease I have used for my jumper!
Not only that, my Full Bust Circumference point was also about 4cm/ 1.5″ higher up because my good bra is more supportive and pulls my boobs up (to where they used to be ;-)).
So, before you measure yourself, think about the type of bra you are likely to wear with the finished garment and measure yourself with that bra on because it will affect your full bust circumference and where your full bust lands on your torso.
2 – What About Crochet Garments?
The exact same method given in this blog post can be used for crochet garments too.
The thing to remember is that crochet stitches tend to be wider and deeper than knit stitches. This just means that fewer stitches will need to be decreased over fewer rounds/ rows of crochet.
I have had the same success making these in crocheted garments as I have with my knitted garments. So, although I am using a knitted garment as my example for this blog post, it could just as easily be a crocheted one.
3 – How and Where to Measure Your Bust
Make sure you have the right bra on and the thickness of top you are likely to wear under your garment. Grab a fabric measuring tape and get ready to jot down three measurements.
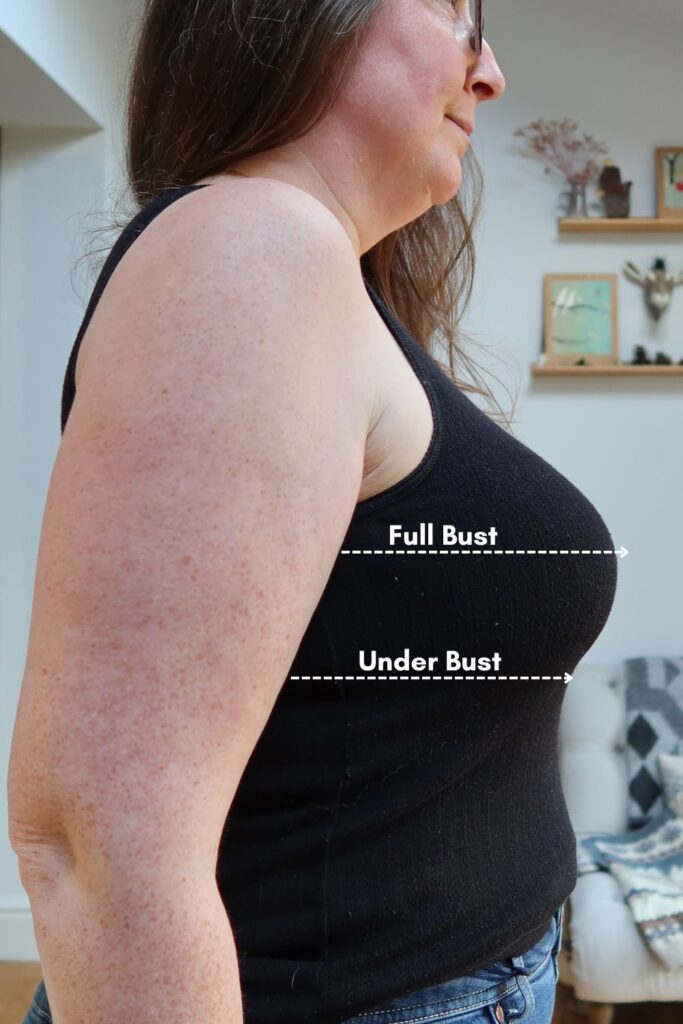

Take these three measurements:
- Full Bust Circumference – bring measuring tape around your back and bust. Your full bust is where it is fullest (basically the centre of your nipples).
- Under Bust Circumference – bring measuring tape around your back and underneath your bust. Your under bust is where the bottom of your bra/ underwire sits. The measurement does not include any of the actual breast, just the ribs underneath them.
- Half Bust Depth – place measuring tape at centre full bust point of one breast and form it over the bottom half of the breast to measure the depth of half of the breast. Make sure the tape follows the form of the breast and isn’t just dangling down. The dangle will give a smaller and inaccurate half bust depth measurement and you need accuracy here.
4 – What Do the Measurements Mean?
You have likely already chosen a garment that you want to knit or crochet. It doesn’t matter if this is a top down, bottom up, raglan or circular yoke design, the same idea works for them all.
With your garment pattern to hand, work out which size you are making. This is probably based on full bust circumference (most garment patterns are) and you will need to include the amount of ease you require to choose a size that fits best with your Full Bust Circumference +/ – ease.
Start by calculating the difference between Full Bust Circumference and Under Bust:
My example:
My Full Bust Circumference is 111cm and my Under Bust Circumference is 96cm. Therefore, I have a 15cm circumference difference from one to the other. My Half Bust Depth is 10cm.
Because I am working top down, I need to decrease the number of total stitches that will equate to 15cm, over the 10cm Half Bust Depth. That will give me a nicely fitted jumper that fits my bust rather than falling off it like a tent.
What about ease though? Well, the jumper size I am knitting at my gauge, is giving me 5cm positive ease. So, the full bust circumference is going to be roughly 116cm. By reducing 15cm when I get to my under bust, it will be roughly 111cm, so the 5cm positive ease is carried through the bust shaping.
What about gauge changes after blocking? If your round gauge changed after blocking, work out how many extra/ or fewer rounds you need to take into account for the actual depth of your Half Bust.
If you ended up with fewer rounds over 10cm after wet blocking, you would need to stop knitting before you get to your full bust point.
If you ended up with more rounds over 10cm after wet blocking, you would need to knit beyond your full bust point.
5 – How to Calculate How Many Stitches to Decrease (Top-Down Jumpers)
If you are working a top-down jumper, you need to get to the Full Bust Circumference point. This will always be after you have split for the sleeves. I am at this point in my images below.
REMEMBER – that this needs to take into account any changes that will occur when you block your jumper. I had very little gauge difference with my blocked and unblocked gauge swatch, so can just use my jumper as my guide.
If your round gauge changed after blocking, work out how many extra/ or fewer rounds you need to take into account for both your Full Bust point and the likely actual depth of your Half Bust.

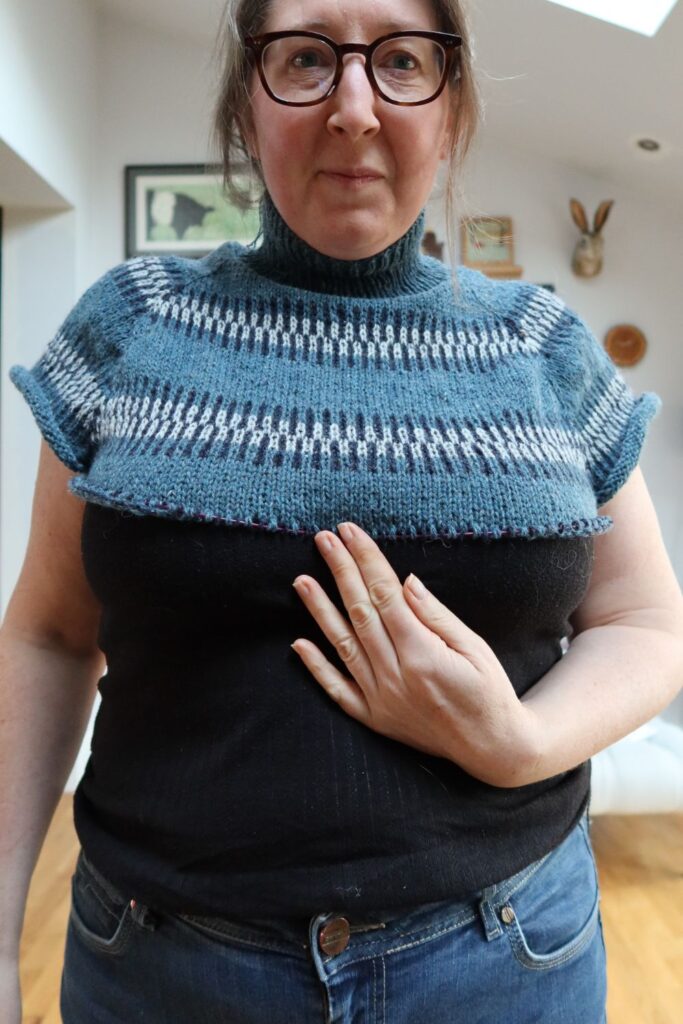
Decrease calculations
Using your blocked swatch for guidance, work out how many stitches equate to the number of centimetres/ inches you need to reduce by.
My Example:
My blocked stitch gauge was 20 stitches over 10cm. Therefore, 20 stitches divided by 10cm = 2 stitches in 1cm.
I need to reduce the circumference by 15cm overall, so 2 stitches per cm means:
2 x 15 = 30 stitches to reduce over the Half Bust Depth.
My decreases are made at the sides of the garment only and I decrease evenly on the front and the back of the garment (as you do when you increase/ decrease for a raglan construction).
This means that my total decreased stitch count is ideally a multiple of 4. 30 doesn’t divide evenly by 4, so I am going to err on the side of caution and adjust my total stitch decrease to 28 instead. This creates marginally more positive ease from the under bust downwards.
My blocked round gauge was 24 rounds over 10cm. Therefore, I have 24 rounds to decrease by 28 stitches.
Each decrease round is going to reduce the number of stitches by 4. Therefore, 28 divided by 4 means that I have 7 decrease rounds to fit into 24 rounds of knitting.
This is where I now take pencil to paper to work out how I can evenly spread out my decrease rounds. I don’t want to have two decrease rounds, one after the other.
24 rounds divided by 7 is 3.4. So, I need to knit a decrease round, roughly every 3 or 4 rounds. This is what my decrease calculations look like:
Rnd 1: Decrease, Rnds 2-4: Knit
Rnd 5: Decrease, Rnds 6-8: Knit
Rnd 9: Decrease, Rnds 10-12: Knit
Rnd 13: Decrease, Rnds 14-16: Knit
Rnd 17: Decrease, Rnds 18-20: Knit
Rnd 21: Decrease, Rnds 22-23: Knit (note that this one only has two rounds of knit rather than three, to keep the decreases within the 10cm/ 24 rounds of the Half Bust Depth.
Rnd 24: Decrease
Here is how the above calculations look on my jumper so far:
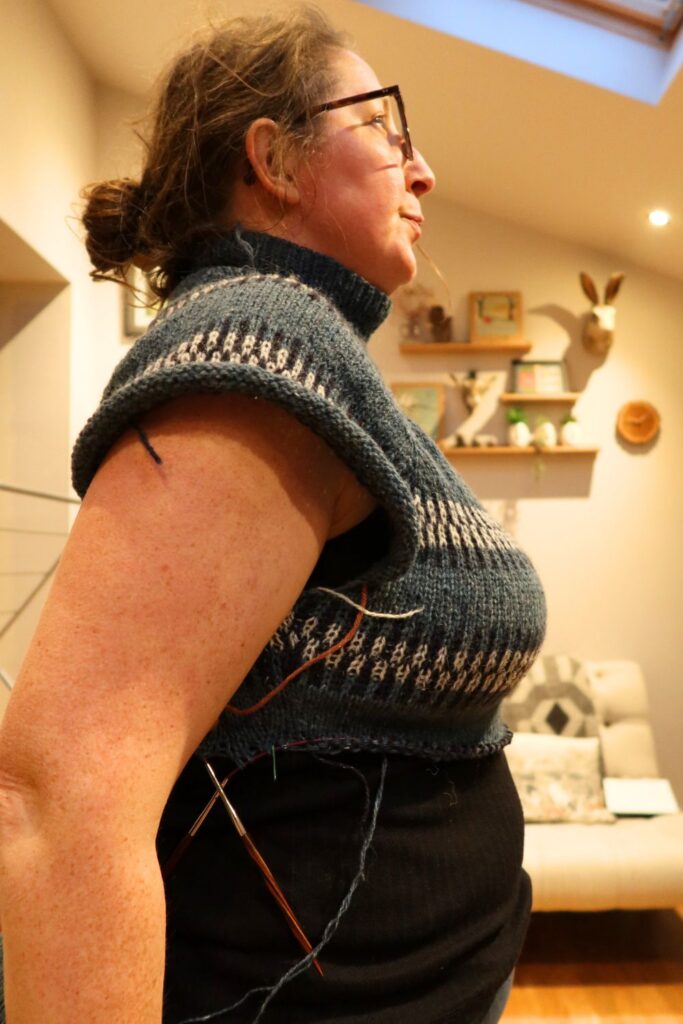

The decreasing over the bottom half of my bust has created a much more fitted shape that doesn’t hang off my chest like a tent.
6 – How to Calculate How Many Stitches to Increase (Bottom-Up Jumpers)
If the size you are making is dictated by your full bust circumference, you will have to do the calculations before you even start the jumper.
With a bottom-up sweater, you need to start with a smaller number of stitches than the pattern instructs and make increases when you get to the Under Bust (back to the pattern stitch count). This may affect any texture/ cables/ lace/ colourwork in your garment, so think carefully about how you proceed.
REMEMBER – that this needs to take into account any changes that will occur when you block your jumper. I had very little gauge difference with my blocked and unblocked gauge swatch, so can just use my jumper as my guide.
If your round gauge changed after blocking, work out how many extra/ or fewer rounds you need to take into account for both your Full Bust point and the likely actual depth of your Half Bust.
Increase calculations
Using your blocked swatch for guidance, work out how many stitches equate to the number of centimetres/ inches you need to reduce by.
My Example:
My blocked stitch gauge was 20 stitches over 10cm. Therefore, 20 stitches divided by 10cm = 2 stitches in 1cm.
I would need to increase the circumference by 15cm overall, so 2 stitches per cm means:
2 x 15 = 30 stitches to increase over the Half Bust Depth.
My increases are made at the sides of the garment only and I increase evenly on the front and the back of the garment (as you do when you increase/ decrease for a raglan construction).
This means that my total increased stitch count is ideally a multiple of 4. 30 doesn’t divide evenly by 4, so I am going to err on the side of caution and adjust my total stitch increase to 28 instead. This creates marginally more positive ease from the under bust downwards.
My blocked round gauge was 24 rounds over 10cm. Therefore, I have 24 rounds to increase by 28 stitches.
Each increase round is going to add 4 more stitches to my round total count. Therefore, 28 divided by 4 means that I have 7 increase rounds to fit into 24 rounds of knitting.
This is where I now take pencil to paper to work out how I can evenly spread out my decrease rounds. I don’t want to have two increase rounds, one after the other.
24 rounds divided by 7 is 3.4. So, I need to knit an increase round, roughly every 3 or 4 rounds. This is what my increase calculations look like:
Rnd 1: Increase, Rnds 2-4: Knit
Rnd 5: Increase, Rnds 6-8: Knit
Rnd 9: Increase, Rnds 10-12: Knit
Rnd 13: Increase, Rnds 14-16: Knit
Rnd 17: Increase, Rnds 18-20: Knit
Rnd 21: Increase, Rnds 22-23: Knit (note that this one only has two rounds of knit rather than three, to keep the increases within the 10cm/ 24 rounds of the Half Bust Depth.
Rnd 24: Increase
7 – Where To Decrease/ Increase in a Round
I have shown you how to make the calculations, but where do you actually make the decreases/ increases?
I always make the decreases/ increases in the middle of each side.
For knitting: I add place markers to either side of the stitch in the middle at each underarm and decreases/ increases are made before the first place marker and after the second place marker on both sides.
For crochet: I add a place marker to the middle stitch at each underarm and decreases/ increases are made before and after the place marked stitch on both sides of the jumper.
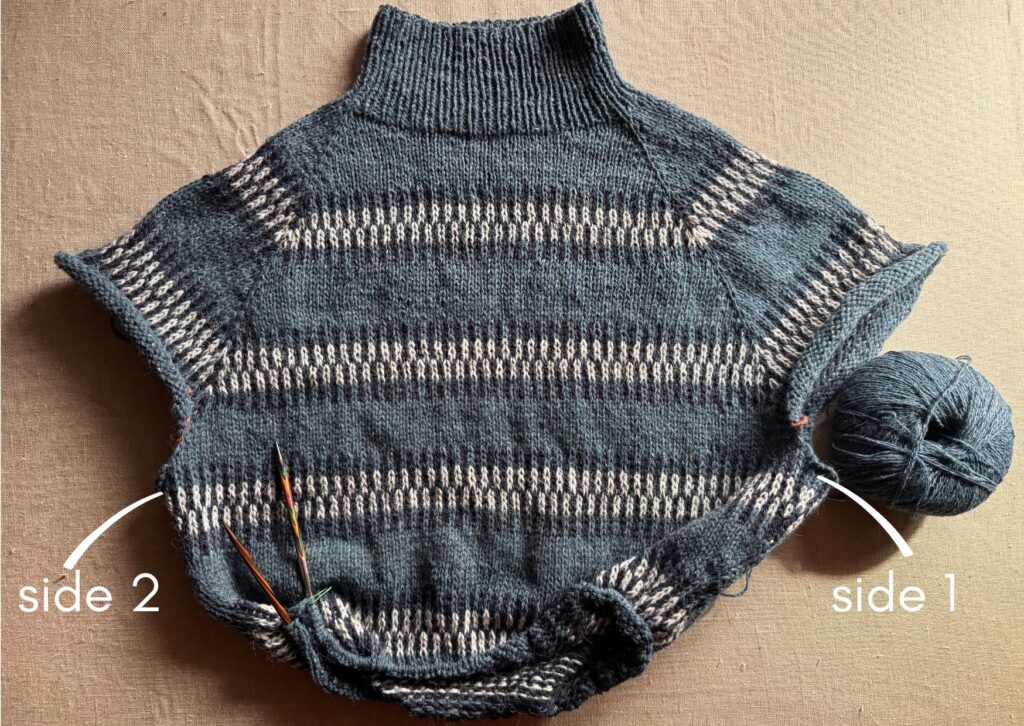
This helps to keep the decreases/ increases hidden, especially if there are changes to colourwork, lace, cable or texture sequences with the Half Bust Depth decrease/ increase rounds.
8 – Troubleshooting
This isn’t a particularly refined way of creating a more fitted garment, but it does work!
Here are some things to think about before you try this method:
- Is there a lot of cable/ lace/ colourwork detail within the rounds that you are going to make decreases/ increases in? If yes, you really need to think about how the stitch count is going to alter that detail and whether it’s worth it or not. I had a simple two stitch repeat colourwork in my example, which was easy to manage and hide in the underarms of my jumper (see below).
- Make sure you are using your blocked gauge for your calculations, not just trying on your jumper.
- If you have a very large bust, you may want to do more of the decreases/ increases on the front half of your jumper rather than the back. This will help create a better formed fabric around your bust, with less effect on the fabric on the back of your jumper.
- If your stomach has a similar circumference to your bust, I would be tempted to stick to the stitch count given in the jumper. With the right amount of positive ease, the fabric should skim over your bust and stomach, creating a nice silhouette.
- If you have an hourglass figure, you may want to apply the same thinking to your hips. For top-down jumpers, you can do the decrease at the bust, knit straight down to your hips and then use the information in ‘How Many Stitches to Increase’ but apply it to the circumference and depth of the jumper at your hips (remembering that this may include ribbing that is usually at a tighter gauge). If you are doing Bottom Up, use the information in ‘How Many Stitches to Decrease’ but apply it to the circumference and depth of the jumper at your hips.
- If you have big boobs and are straight bodied from your under bust through to your hips (this is my shape), then only the bust shaping is required.
- Remember to wear the right bra when you take your measurements! It could be the difference between your jumper looking meh and it looking fitted to your body!

Any More Bust Adjustment Tips?
If you think I have missed any tips on making bust adjustments for sweaters, let me know.


Let’s Be Social
I am usually found in these online places, or you can join my newsletter where I talk about all things yarn, crochet and knitting:
- YouTube crafting podcast and crochet/ knit tutorials– @faydhdesigns
- Pinterest – FayDHDesigns
- Instagram – @faydhdesigns
- Newsletter sign up


