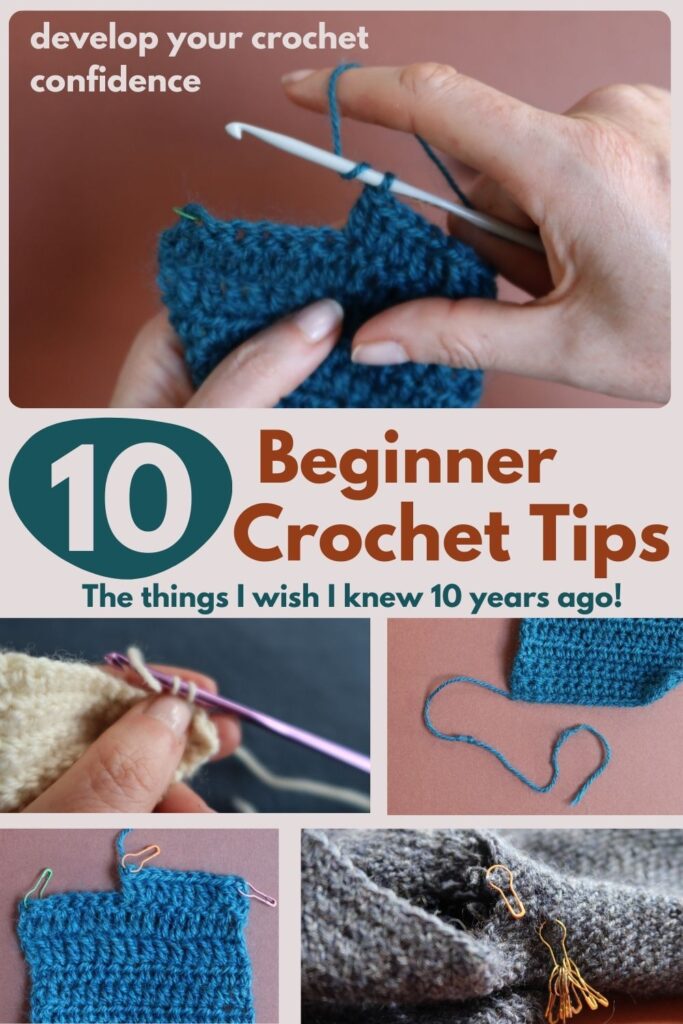
When you fall deeply in love with a craft, you can’t help but want to make it as flawless as possible. That goal comes hand in hand with questioning what you are inevitably taught as a beginner crocheter and investigating better ways of doing things.
As I type this, I have been designing crochet items a smidge under 10 years and I have picked up a thing or two in that time. Let me take you on a crochet journey and share my absolute best top tips with you.
Whether you are new to crochet or are a confident crocheter, I am pretty sure you will learn something from my top crochet tips and hacks.
1 – There is no right way to hold your hook
A bit like picking up a pencil, whichever hold you prefer is the one that is right for you. The Crochet Police do not exist (apart from some keyboard warriors), nobody is going to knock on your door and snatch the hook out of your hand!
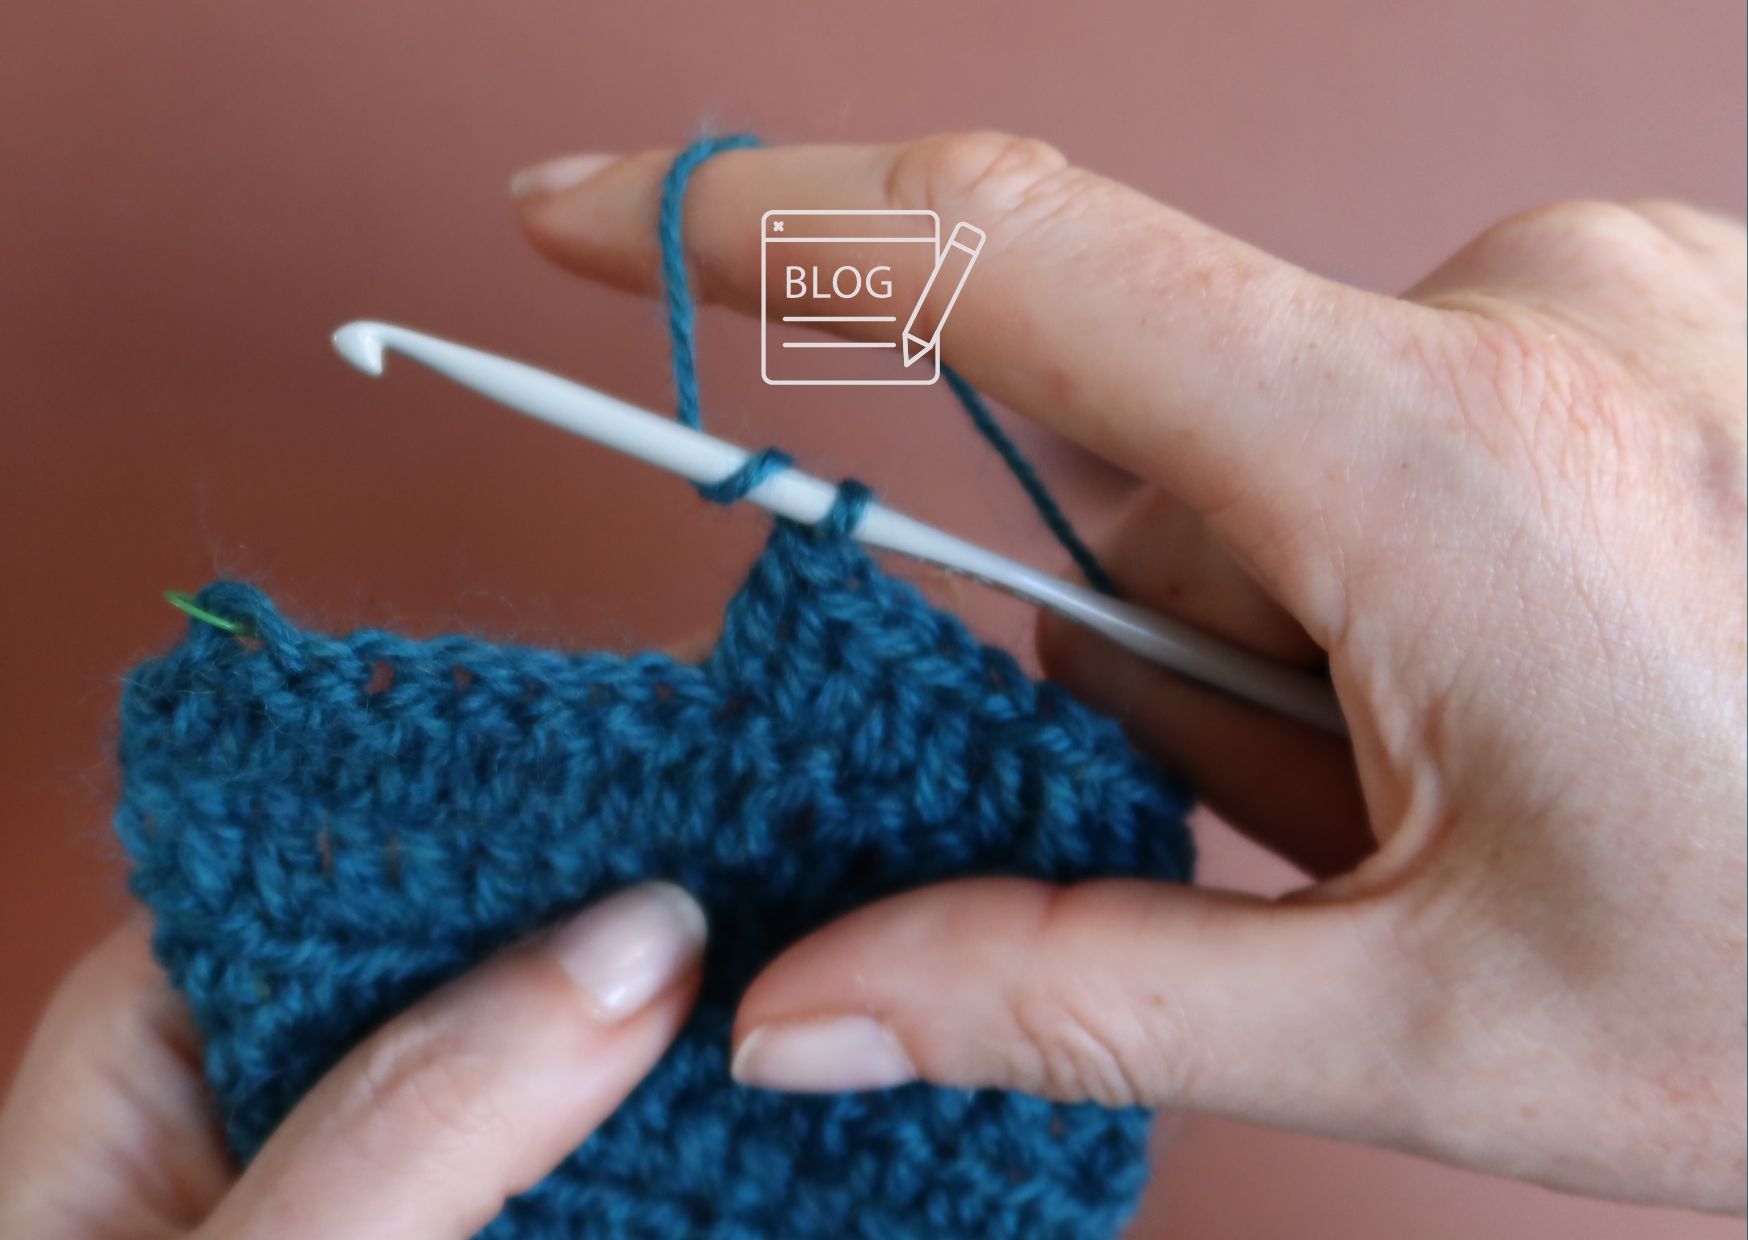
I hold my hook and yarn in a very different manner. I am right handed and I hold both in my right hand.
TOP TIP – If you are new to crochet and already knit, try these ways of holding the hook and yarn:
- Continental knitters hold the hook in the hand you would hold your dominant needle and the yarn in the other.
- English/ flicker knitters: try doing what I do (see the image below). Hold the hook and the yarn in your dominant hand. Your non-dominant hand will be used to hold up the fabric. Because you are asking one hand to do a lot of the work, you may prefer a slim, light-weight crochet hook, especially because the motion requires you to almost let go of the hook with every step of the stitch.

2 – Make a secure Slip Knot
Slip knots are the starting place of any crochet (or knitting) project and there is a best way to make them, which is by using the working yarn (not the yarn tail) to pull through the loop. This becomes the loop that sits on your hook, ready to crochet foundation chains.

By using the working yarn, you keep the slip knot under tension as you move on with the foundation chain. If you use the tail end instead, it gets very tight and can sometimes be too difficult to work into.
For crochet, this slip know will become part of your first foundation chain.
If you need more help with making slip knots, I have a helpful video tutorial here.
3 – Use a bigger Hook for your Foundation Chain
It can be tempting to think “I’ll just keep my tension loose” when making a foundation chain, but there is a better way.
Simply move up 0.5mm of a hook size. This will give you a slightly looser chain and more importantly, even chain sizes to work back in to.
The foundation chain always has less give to it and by moving up a hook size, you are adding more yarn and therefore give to each of the chains.
Extra top tip – if you are struggling to identify which row edge is your foundation chain and which is your last worked row or round, give them a tug. The edge with the greater resistance is going to be the edge with the foundation chain.
4 – Work Back bumps of Foundation Chain
It seems like such a simple tip, but it really helps to elevate your finished project.
A foundation chain is made up of three loops – the front loop, the back loop, and the back bump/ third loop. If you work your first row/ round into the back loop, rather than under the front or back loops, it pushes the front and back loops to the bottom of the foundation chain, leaving a really neat line of stitches that will mirror the top of your final row/ round.
Better still, if you end up adding a trim or border to the foundation chains, because the front an back loops are at the bottom, it’s really easy to count stitches and know exactly where to place your hook!
For more information on how to Work In To Back Bumps/ Third Loops of Chains, I have a video tutorial here, OR a photo tutorial here.


5 – Record Hook Size with Knots
How many times have you started a project and told yourself “I will definitely remember what hook size I am using“?
After many years of not remembering, I now deploy two systems:
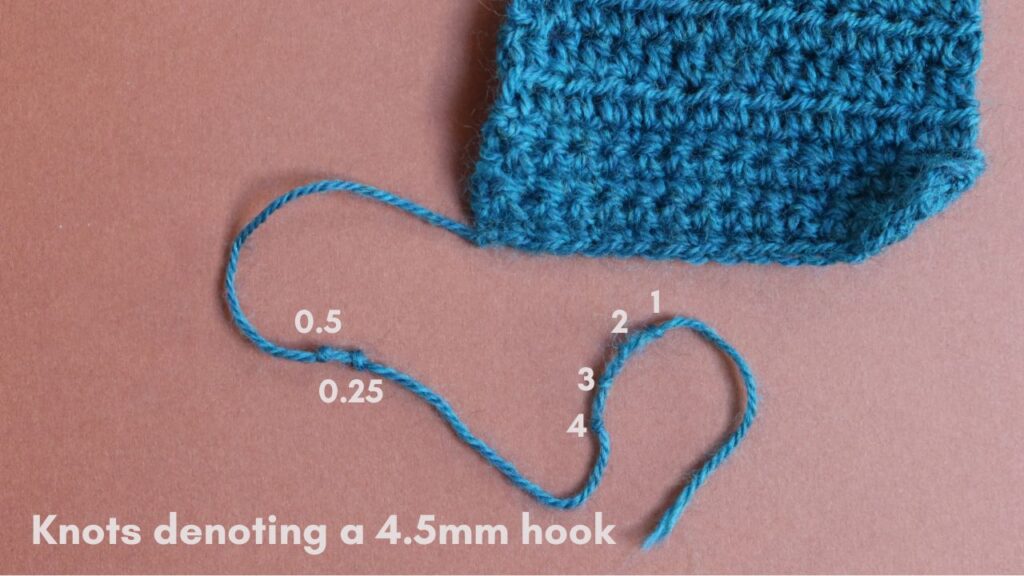
- I leave a 30cm tail on my swatch. At the bottom of the tail I add however many knots close together to show the hook size in whole numbers. A 3mm hook would have three small knots at the tail end, a 5mm hook would have 5. If I am using a 3.5mm hook, I leave a space, then add further knots to show how many 0.25mm increments there were in my hook. So, a 4.5mm hook would have 4 knots at the tail end, a space and then two knots up near the fabric (one for each 0.25mm in my hook size).
- Recently though, I started a Whatsapp Group with my husband where I send through project notes, grams of yarns used and hook size. He knows he doesn’t need to read the messages because it’s just a place for me to quickly record my progress. Even if he left the group, I could still send messages to it and keep a record of my project. I don’t always carry a notepad and pen with me, but I do always have my phone…
6 – Hold Your Hook Parallel to your Stitches
To my mind, this is one of the most valuable lessons that a beginner crocheter can learn. The relationship between your hook placement and yarn tension is very Three Bears and you want to get it ‘just right’.
Yankers (Mummy Bears) – by pulling/ yanking on the yarn with every yarn around hook, it will pull your crochet hook down and make your tension extremely tight. Tight tension makes the front and back loops at the top of the stitch tight, making them hard to work into on the next row/ round.
Lifters (Daddy Bears) – the complete opposite of Yankers, Lifters are all loosey goosey with their tension. They pull their hooks too far up and away from the fabric. This pulls through more yarn for every stitch element and results in much taller stitches and a floppy, open fabric with more drape than intended.
Riders (Baby Bears that get it just right) – Ideally, when you complete the first pull through, your hook is pulled up so that it runs parallel with your fabric. That first yarn pull through sets the scene for the tension of that stitch and is called the golden loop.

Every now and then, stop, and pay attention to your tension and whether or not your hook is running parallel to your fabric.
If you can learn to be a consistent crochet Rider, you are far more likely to hit the tension of a designer’s pattern. I can’t speak for everyone, but many designers work hard to have good, consistent tension for their designs, based on riding, rather than yanking or lifting.
7 – Use Stitch Markers
Such a basic tip, but one that many beginner crocheters don’t know about or ignore…
I have never found a method better than using stitch markers for keeping my round and row counts correct. Save time, keep your stitch count on track and use stitch markers.
I tend to use bulb stitch markers because they often come free with clothing, are easy to use, they work for marking my crochet and knitting projects and are light, so don’t add lots of extra bulk and weight to my projects.
My method is to use a green bulb pin for the beginning of my right side row or round, a red for the beginning of my wrong side row or end of round. I use an orange bulb pin to hold my stitch. This simple traffic light stitch marker system allows me to easily work out whether I am working a right side or a wrong side row. If I am working in the round, it’s a great way to identify how far through a round I am.
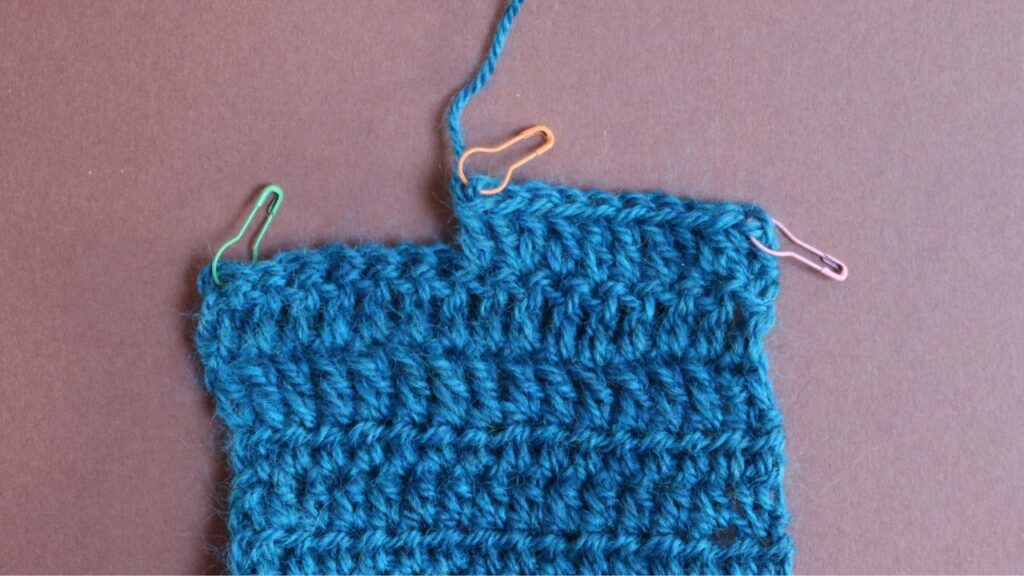
I have never found a method better than using stitch markers for keeping my round and row counts correct. Save time, keep your stitch count on track and use stitch markers.
Another way that I use bulb pins is to count how many increases or decreases I need and to pin the appropriate number of bulb pins to my project.
As an example, if I was crocheting the sleeve of a garment and I knew that I needed to do 10 decreases down the length of the sleeve, I would cluster 10 bulb pins together and mark up each decrease. I don’t need to keep on counting my decreases, because I have already counted the pins.
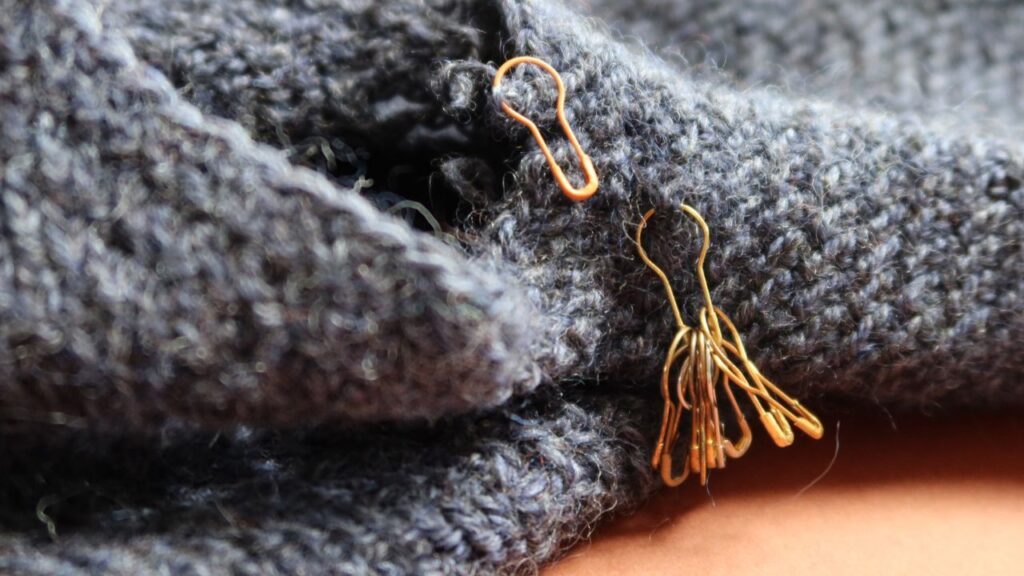
You can also use this method for marking off a number of rows/ rounds. If you have a 100 row blanket to crochet, mark off every tenth round to keep a quick visual count on your project.
Psychologically, this is also helpful because you are ticking through the decrease, one dopamine inducing bulb pin at a time!
8 – Yarn Under v Yarn Over – Know the Difference!
If you have taught yourself to crochet through the power of books or YouTube, you may be making stitches with yarn unders, rather than yarn overs and you need to check because yarn unders can make completely different stitches!
The images below show the difference with treble crochets (double crochet in the US) in rounds and then in rows. Not only do the stitches look different, but the stitch width is smaller and the round/ row gauge is tighter.
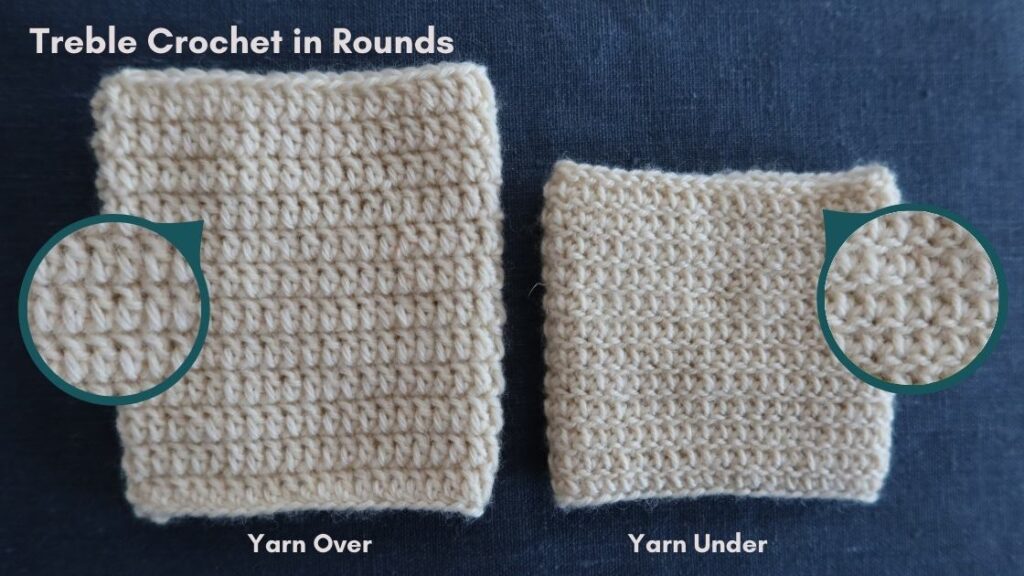
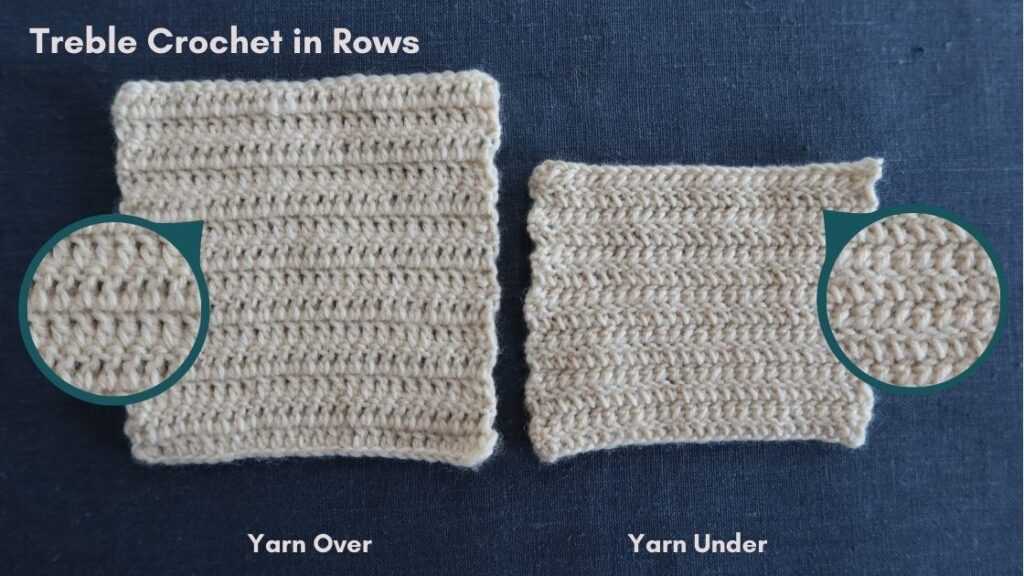
For more information on how to make sure you are doing yarn under rather than yarn unders and a side by side comparison for double, half treble and treble crochet in rows and rounds, head the my ‘Yarn Over or Yarn Under? Yes it Matters!’ blog post.
9 – Starting Stitches – an absolute game Changer!
If I could change the rules of traditional crochet and how it is taught, I would put turning chains into the bin. Forever!
Starting stitches are an infinitely better way of starting off a row or round and here’s why:
- They all act as a stitch and keep your row/ round count accurate.
- They don’t create a big, ugly gap at the side of your work.
- They are easier to work into when if you add a border or a trim.
- They make the edges of your work much straighter and neater.

This image shows a finished Starting Half Treble crochet stitch.
For more information on how to make starting stitches go here:
- Starting Double Crochet (Starting Single Crochet US) is here as a video tutorial OR here as a photo tutorial.
- Starting Half Treble (Starting Half Double Crochet US) is here as a video tutorial, OR here as a photo tutorial.
- Starting Treble Crochet (Starting Double Crochet US) is here as a video tutorial, OR here as a photo tutorial.
10 – Starting Stitches For Round Joins
You can also use starting stitches to join the last stitch and first stitch of a round rather than the traditional method of joining with a slip stitch.
The image below shows a swatch where I have used this method and the accompanying chart so you can see exactly where the Starting Half Treble Crochets are placed to join each round.

Want More Crochet Tip & Tricks?
Of course you do! I would start with these blog posts:
- Crochet Stitch Anatomy – understand the stitches you are creating and how they differ in rows and rounds.
- Invisible Join for Crochet – another step towards flawless crochet. Ditch the slip stitch join!
Let’s Be Social
I am usually found in these online places, or you can join my newsletter where I talk about all things yarn, crochet and knitting:
- YouTube crafting podcast and crochet/ knit tutorials– @faydhdesigns
- Pinterest – FayDHDesigns
- Instagram – @faydhdesigns
- Newsletter sign up


