Waistcoat stitch is the crochet stitch that looks a lot like knitting when worked up into a fabric. It’s very easy to do, and with just one small change to a double crochet stitch (US single crochet) makes a stitch that looks like stocking stitch (stockinette stitch) in knitting.


Waistcoat stitch is generally abbreviated to wc in patterns but you may also see it referred to as center single crochet (US terminology), centre double crochet (UK terminology), knit stitch or crocheted knit stitch. No matter what it is being called, the stitch is the same.
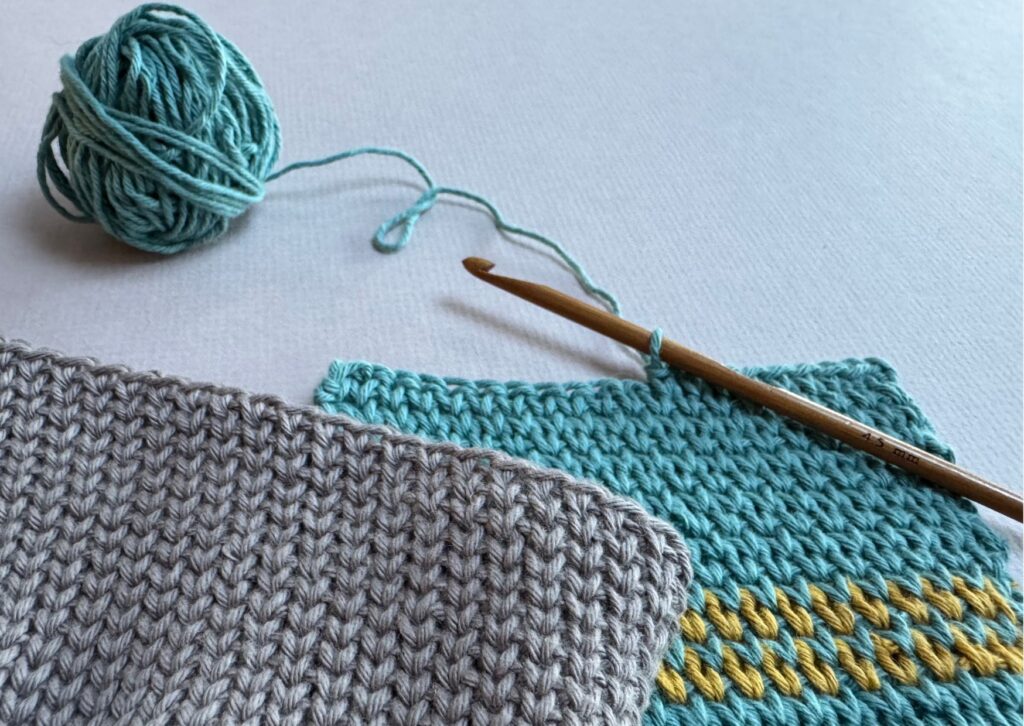
As with most crochet stitches, the look is slightly different if you are working in rows or rounds. If you want a fabric that mimics stocking stitch as closely as possible, then crocheting waistcoat stitch in the round is going to give you the best results.
This blog post will guide you through the intricacies of crocheting waistcoat stitch. It is easy to do, but only if you take your time and use the tips given throughout.
My guide through waistcoat stitch crochet covers:
Much of the information in this blog post is also shown in my Waistcoat Stitch – Video Tutorial.
How to crochet Waistcoat Stitches In the Round
Waistcoat stitch is the same stitch as double crochet (US single crochet) but with one modification. If you need a video to take you through the stitch step by step, just click here.
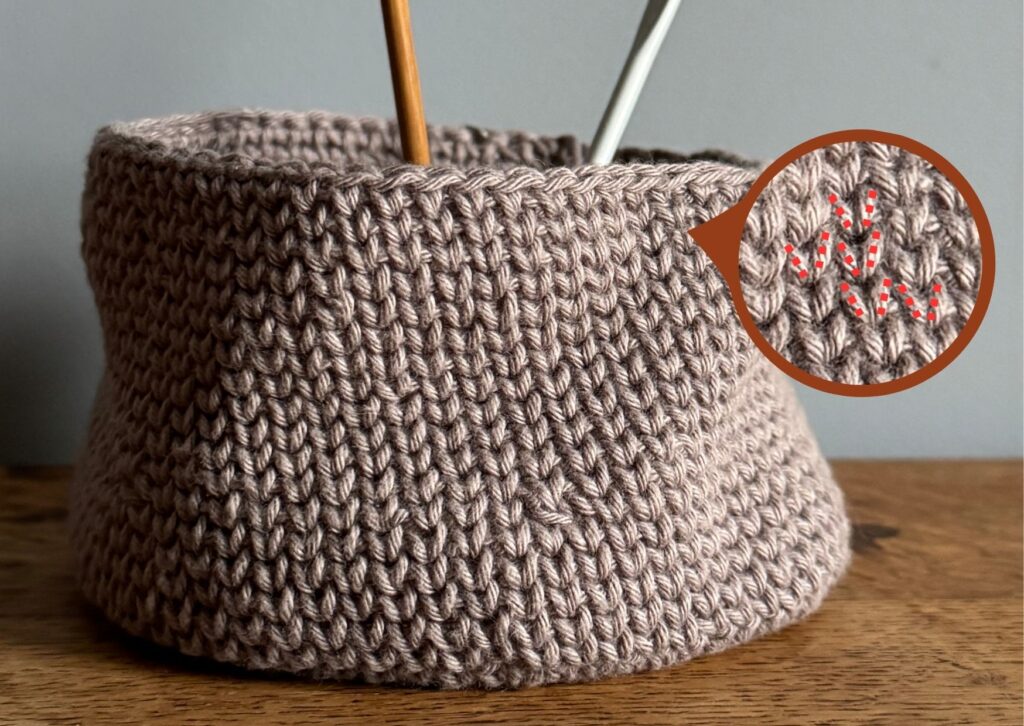
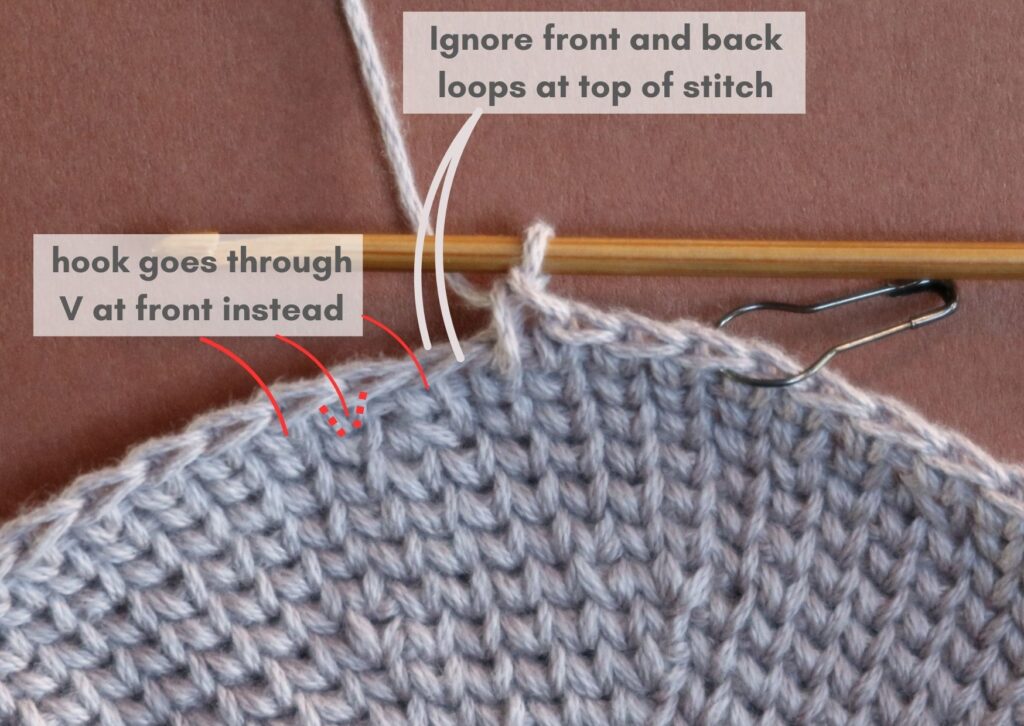
Instead of initially placing the hook under the front and back loops at the top of the stitch, it is placed through the V at the front of the work.
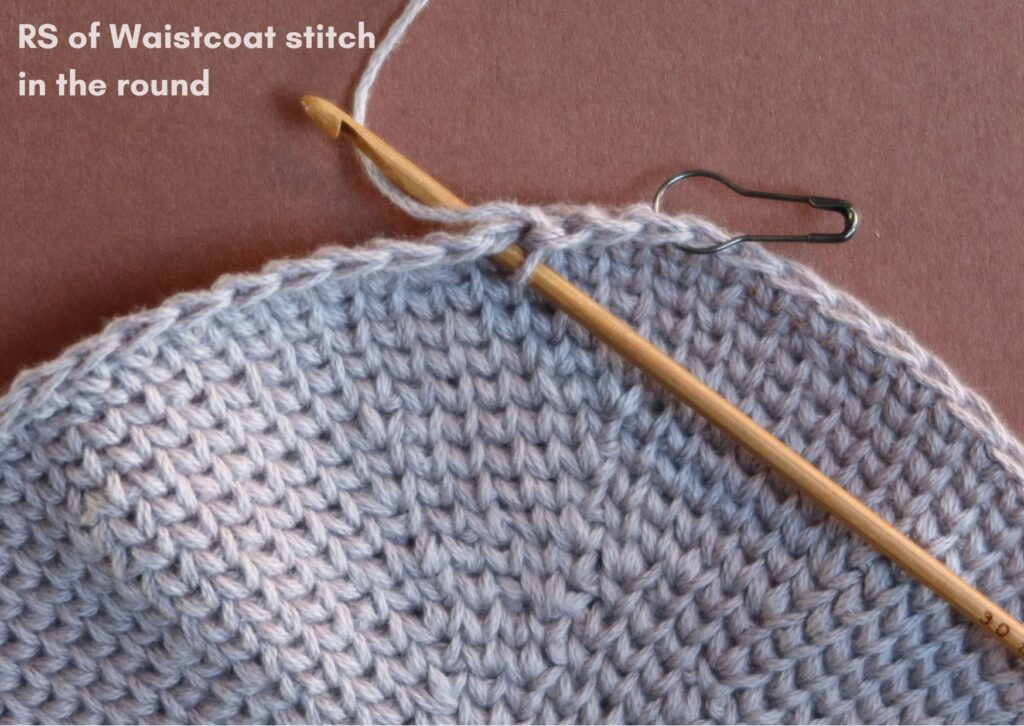
By placing the the hook through the V at the front of the stitch, it splits the stitch and creates a ‘knitted’ look on the right side (RS) of the fabric. With every subsequent round, the next V is split and they stack on top of each other to imitate stocking stitch.
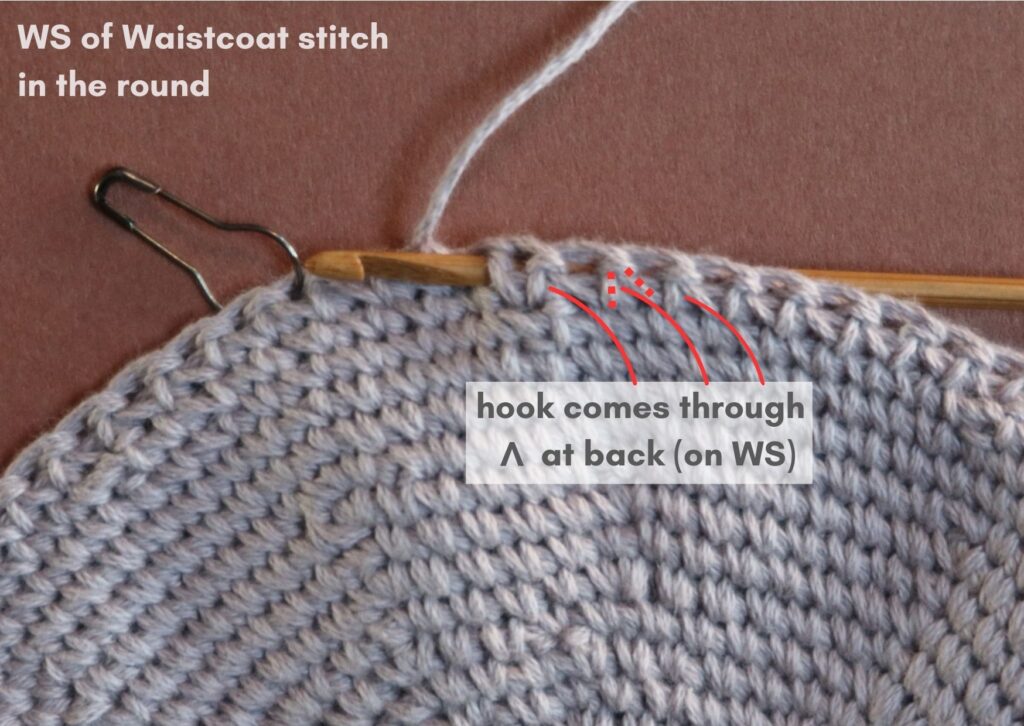
Working in a spiral in the round will create a left lean for right-handed crocheters and a right lean for left-handed crocheters.
I have found that by consistently pushing the hook through the V at the front and making sure it comes out through the correlating upside down V on the wrong side (WS), helps to keep the lean to a minimum. Just flip your work over a little as you push your hook through to make sure it has come out in the right place on the WS.
TOP TIP 1 – If it feels like your hook went through the stitch easily, it probably slipped and went under the front and back loops at the top of the stitch. When this happens, check your hook placement and redo the stitch if the hook has not gone through the V at the front.
TOP TIP 2 – your project will likely begin with a round of double crochets (US single crochets). The basket shown in the photo above starts with the base and an increased number of stitches each round. Because waistcoat stitch is more fiddly to do, it is easier to do a few rounds in double crochet before moving on to waistcoat stitch, especially of the initial rounds won’t be seen.
By the time you move on to waistcoat stitch there will be more fabric to hold onto which makes it easier to see the Vs and to manipulate the hook through them. I promise that after a few rows, waistcoat stitch does get easier!
How to crochet Waistcoat Stitches In Rows
Waistcoat stitch is the same stitch as double crochet (US single crochet) but with one modification. If you need a video to take you through the stitch in rows step by step, just click here.
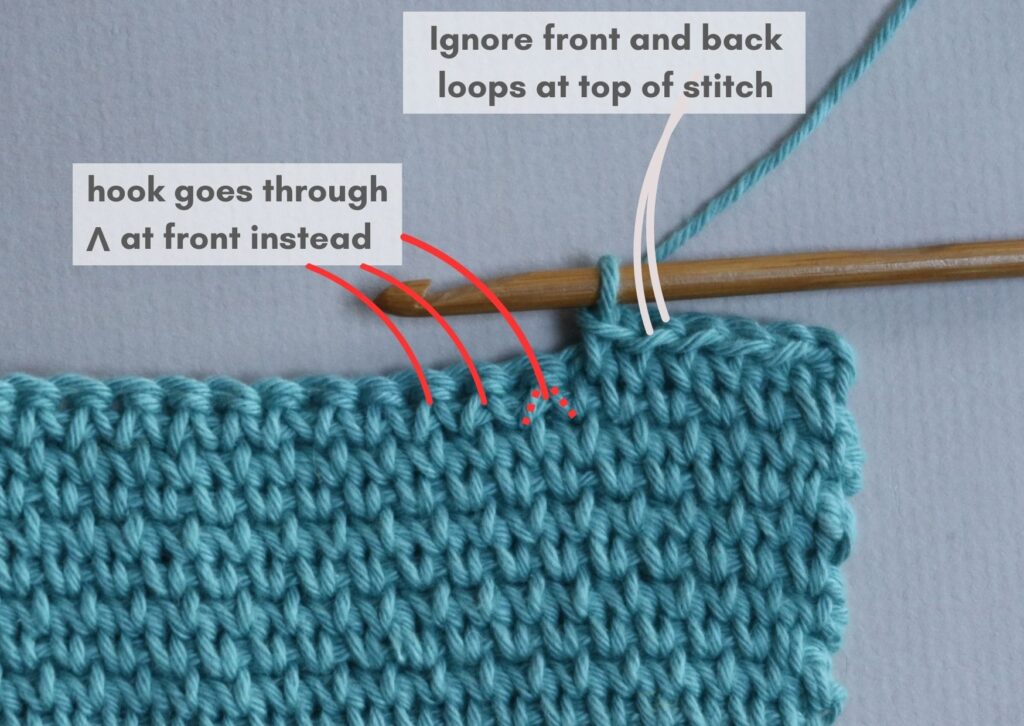
Instead of initially placing the hook under the front and back loops at the top of the stitch, it is placed through the upside down V at the front of the work.
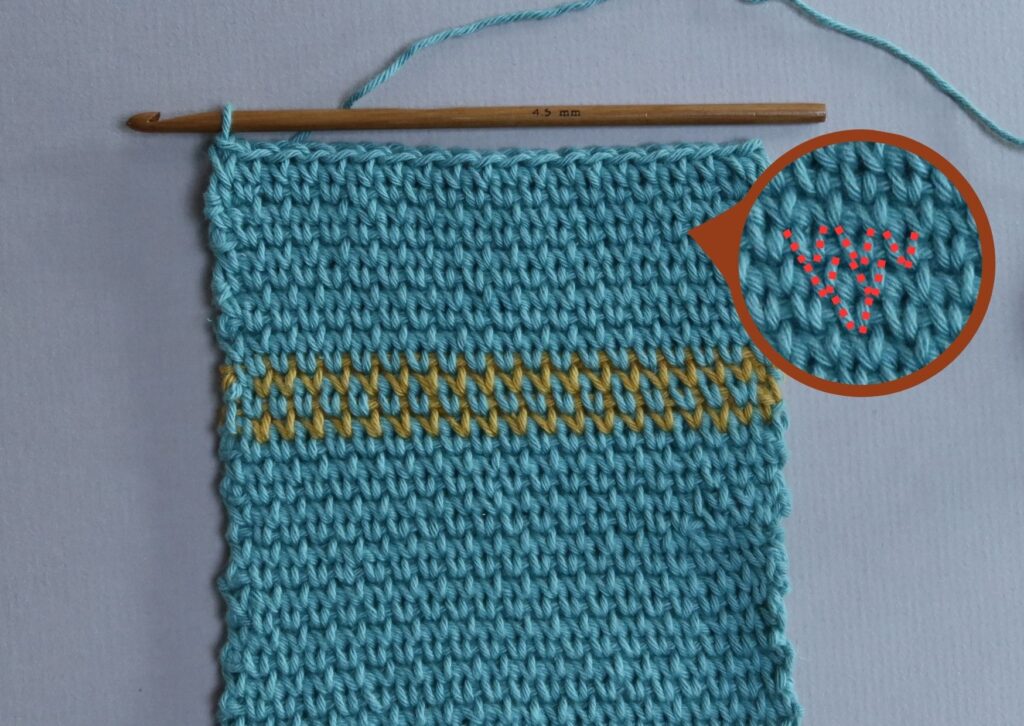
By placing the the hook through the upside down V at the front of the stitch, it splits the stitch and moves the diagonal bar on the left of that split stitch towards the diagonal bar on the right of the next stitch which creates a V look in the fabric.
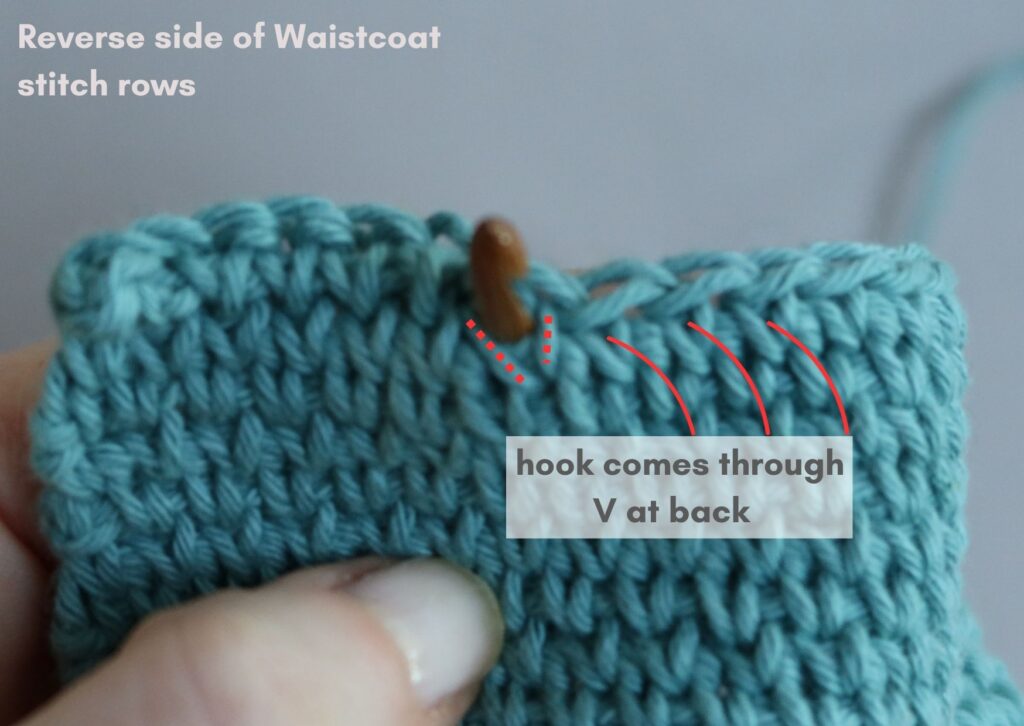
As there is no right or wrong side to rows of waistcoat stitch, it is important to also make sure that the hook comes through the V on the reverse side of the stitch. Just flip your work over a little as you push your hook through to make sure it has come out through the V.
Vs are being created on both sides of the fabric.
TOP TIP 1 – If it feels like your hook went through the stitch easily, it probably slipped and went under the front and back loops at the top of the stitch. When this happens, check your hook placement and redo the stitch if the hook has not gone through the upside down V at the front.
TOP TIP 2 – Row 1 of your project will likely be made up of double crochets (US single crochets). Row 2 will be waistcoat stitch, worked into the upside down V of each double crochet.
Best Hook for Crocheting Waistcoat Stitch
Using the right crochet hook for waistcoat stitch is one of the most important factors and I talk about it here in my ‘Tips for Making Waistcoat Stitch Easy’ video.
The wrong hook will make crocheting waistcoat stitch a painful experience that may result in giving up on the stitch altogether or throwing your project across the room.
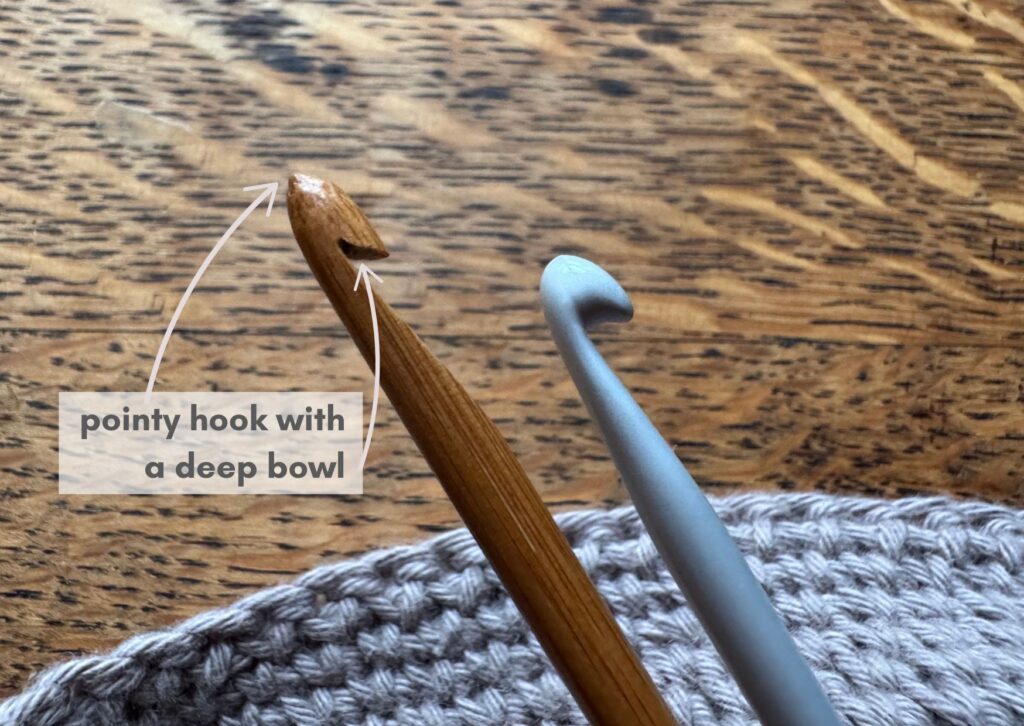
I think there are four important things to look for in the ideal crochet hook for waistcoat stitch:
1 – The pointier the hook, the better. Poking the crochet hook in through the V at the front and out through the upside down V at the back is harder to do and a pointy crochet hook makes the job so much easier!
2 – The hook initially passes through a lot of yarn and a smaller than usual hole. A hook with a deep bowl will help to scoop up and keep the yarn around hook on the hook as it returns back through the yarn and small hole to pull up a loop. If the hook bowl is too shallow, the yarn around hook will slip off and you have to start the stitch again – it can be very frustrating.
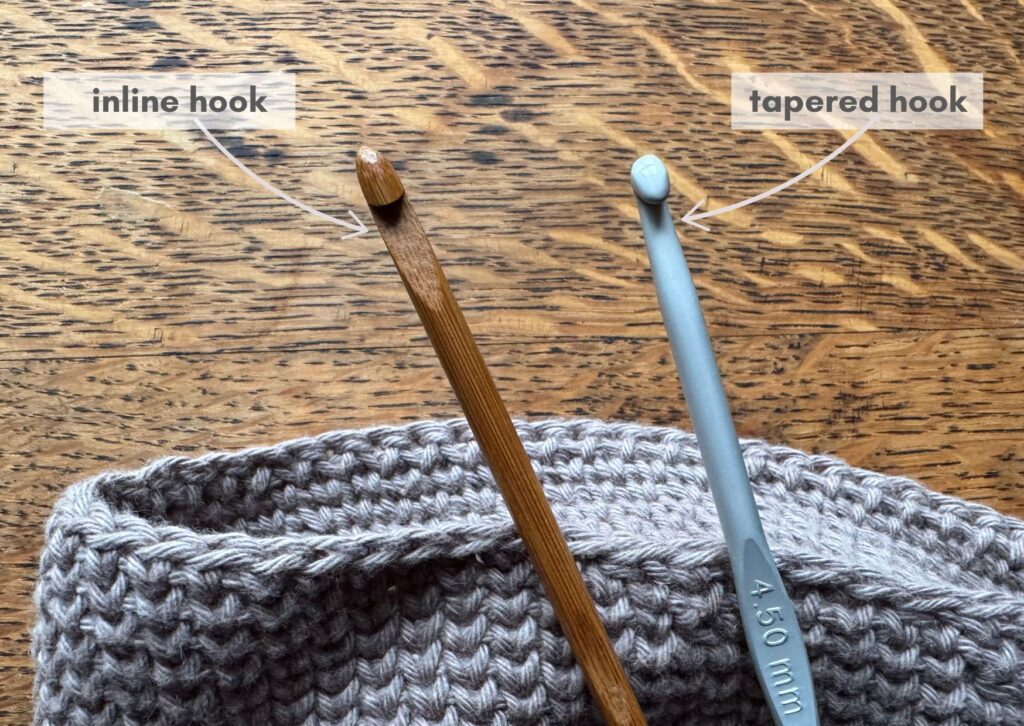
3 – The nature of splitting the V for waistcoat stitch means that it creates a denser stitch. I found that an inline crochet hook forced me to loosen off my tension when crocheting waistcoat stitch because of the larger shaft circumference.
A tapered crochet hook can lead to tighter stitches and tension because of the smaller circumference at the tapered part of the shaft.
4 – Use a larger hook than normal. I would recommend starting with a crochet hook that is 0.5mm larger than you would normally use for that weight of yarn. For instance, the cotton in the image above is a DK weight and I would normally use a 4mm hook for DK yarn. Therefore, I am using a 4.5mm hook for this waistcoat stitch project.
This results in bigger stitches that make hook placement easier and a drapier fabric. If you want a really dense fabric then smaller hook sizes are better but the project will likely take longer to crochet.
My favourite hook for waistcoat stitch? Having tried most of my hooks, I settled for these very pointy bamboo ones. I have used them across lots of different types of yarns and in different sizes and did comparisons with other hooks at the same time. They were consistently easier to use and made crocheting waistcoat stitch more enjoyable.
Best yarn for Waistcoat Stitch
Any weight of yarn is suitable for waistcoat stitch. That said, I have no intention of ever crocheting laceweight yarn in waistcoat stitch – life is just too short for that!
I think that the ideal yarn for waistcoat stitch does not have a lot of fly-away fibres or lots of loose plies. So, I would avoid very splitty cottons/linens and very toothy wool (woollen spun) so that your hook and yarn can pass through the fabric easily and create uniform stitches.
T-shirt yarns, worsted spun wool, high twist cottons and linens are perfect for waistcoat stitch. The higher the twist, the more those waistcoat stitch Vs will shine through with amazing stitch definition.
How to Increase in Waistcoat Stitch in Rounds
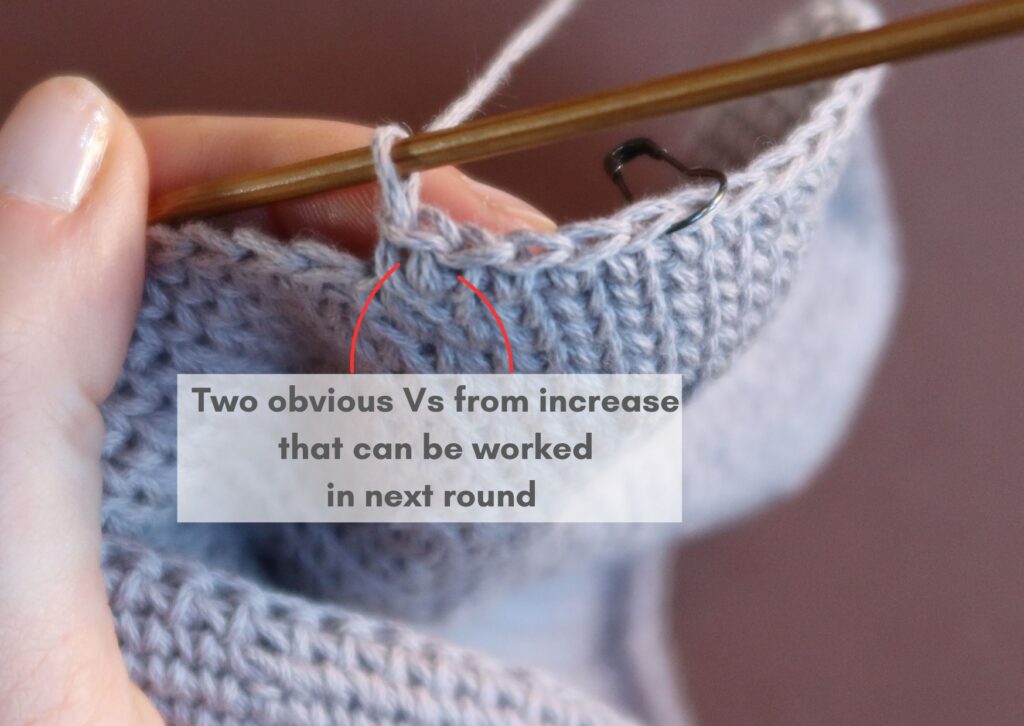
It’s easy to crochet a waistcoat stitch increase in the round. As you would with a double crochet (US single crochet) increase, two waistcoat stitches are worked into the same one stitch.
The only difference is that the hook is place through the V, not the front and back loops.
I also cover increasing waistcoat stitches in the round in my ‘Tips for Making Waistcoat Stitch Easy’ video.
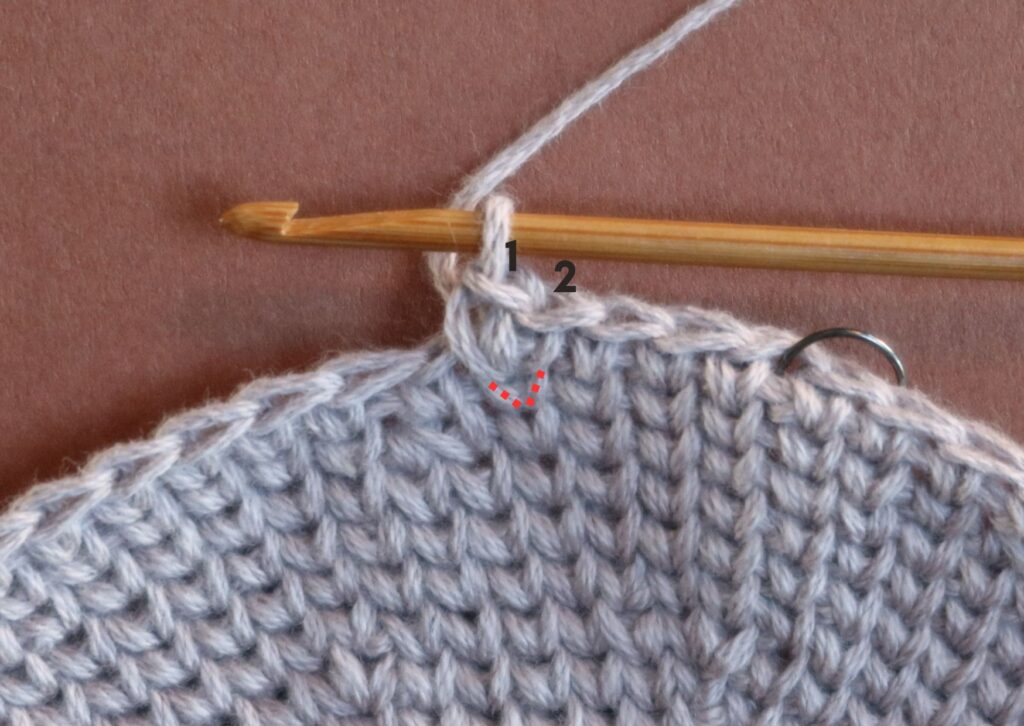
When you come to the increased stitches in the next round, there should be two easy to identify Vs to crochet into.
How to Increase In Waistcoat Stitch rows
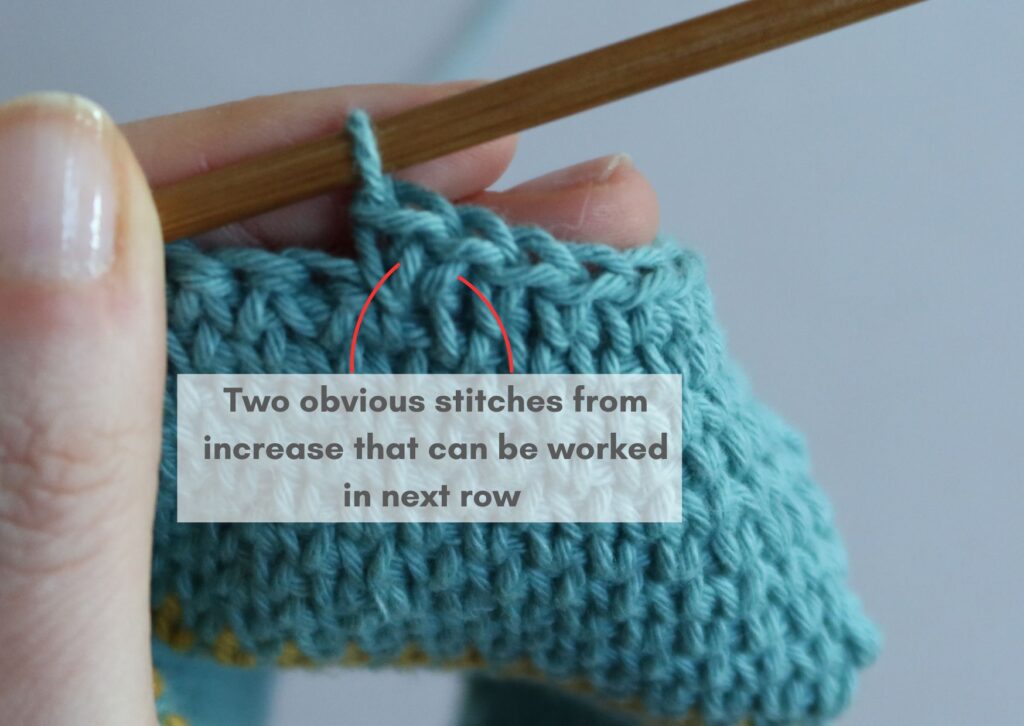
Crochet waistcoat stitch increases are easy to do in rows. As you would with a double crochet (US single crochet) increase, two waistcoat stitches are worked into the same one stitch.
The only difference is that the hook is place through the upside down V, not the front and back loops.
I also cover increasing waistcoat stitches in rows in my ‘Tips for Making Waistcoat Stitch Easy’ video.
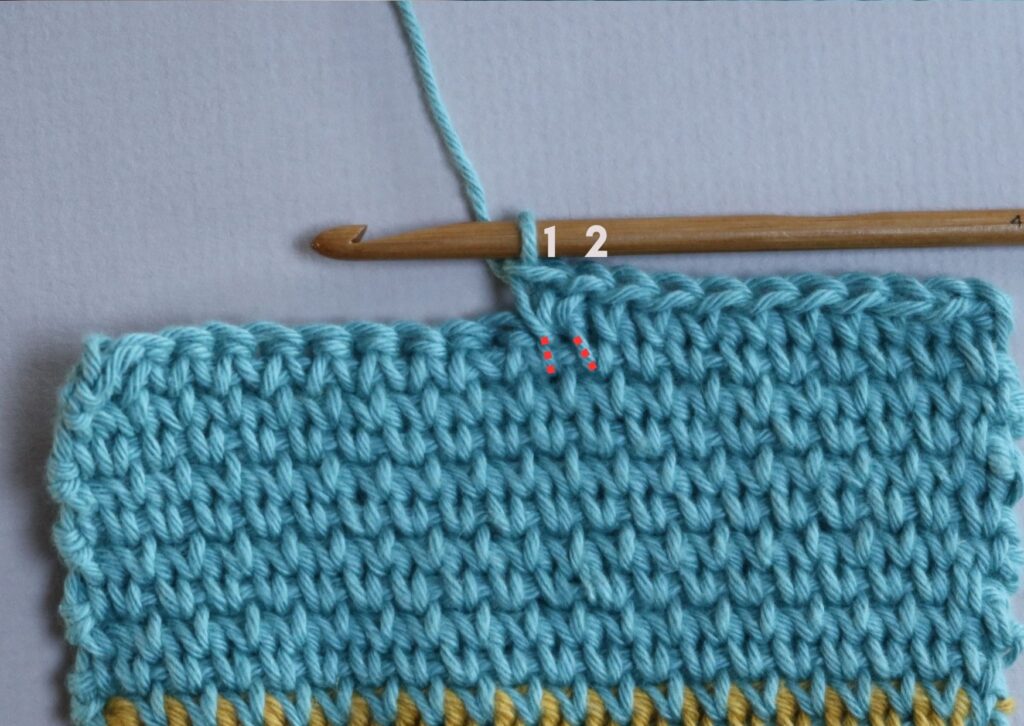
When you come to the increased stitches in the next row, there should be two obvious stitches to crochet into.
How to decrease In Waistcoat Stitch in Rounds
As you would with a double crochet (US single crochet) decrease, two waistcoat stitches can be combined into one stitch. The only difference is that the hook is placed through the Vs, not the front and back loops.
I also cover decreasing waistcoat stitches in the round in my ‘Tips for Making Waistcoat Stitch Easy’ video.
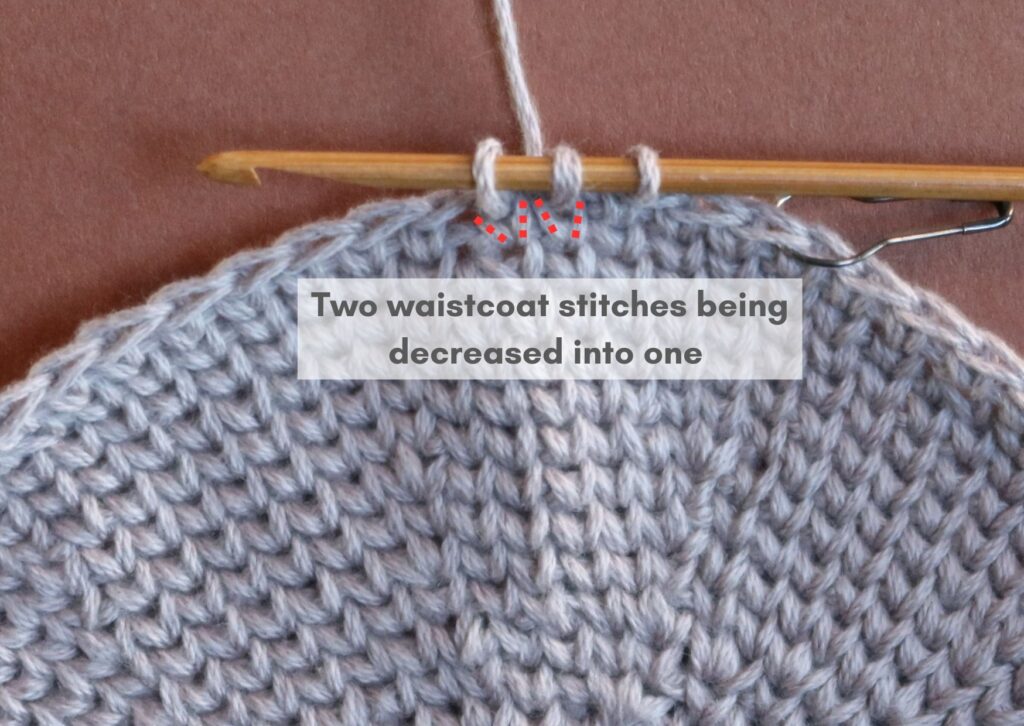
Waistcoat stitch decrease in rounds: place hook through V of first stitch, yarn around hook and pull up a loop (2 loops on hook), place hook through V of next stitch and pull up a loop (3 loops on hook), yarn around hook and pull through all three loops.
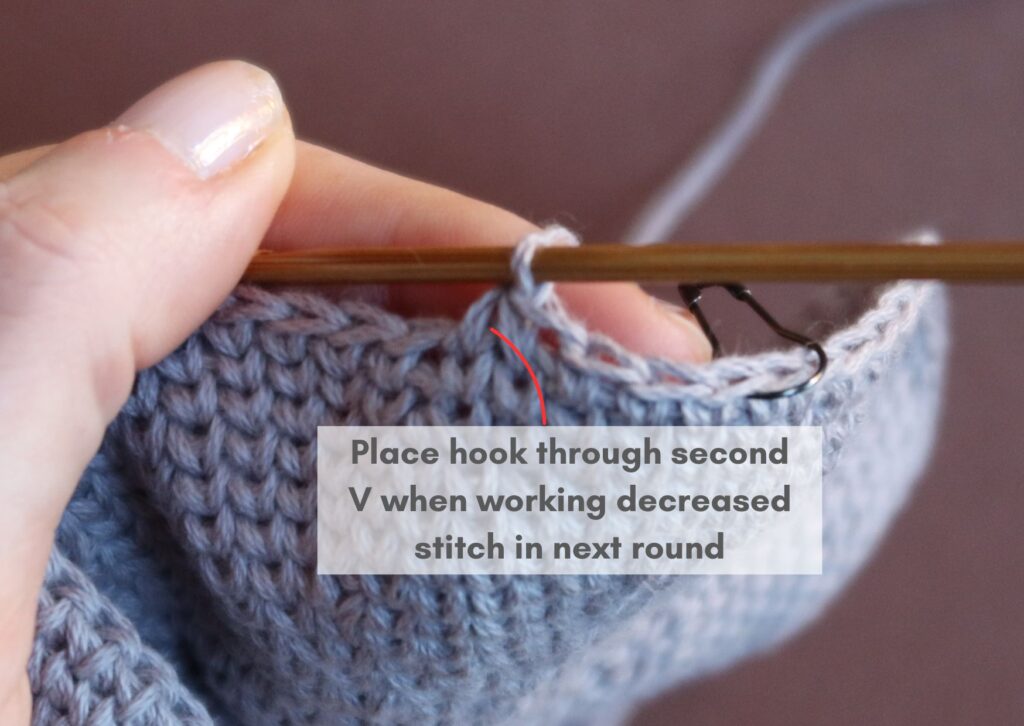
When working the decreased stitch in the next round, place the hook through the V of the second stitch that was decreased. This will help to hide the decrease and present it as one V.
How to Decrease In Waistcoat Stitch rows
As you would with a double crochet (US single crochet) decrease, two waistcoat stitches can be combined into one stitch. The only difference is that the hook is placed through the upside down Vs, not the front and back loops.
I also cover decreasing waistcoat stitches in rows in my ‘Tips for Making Waistcoat Stitch Easy’ video.
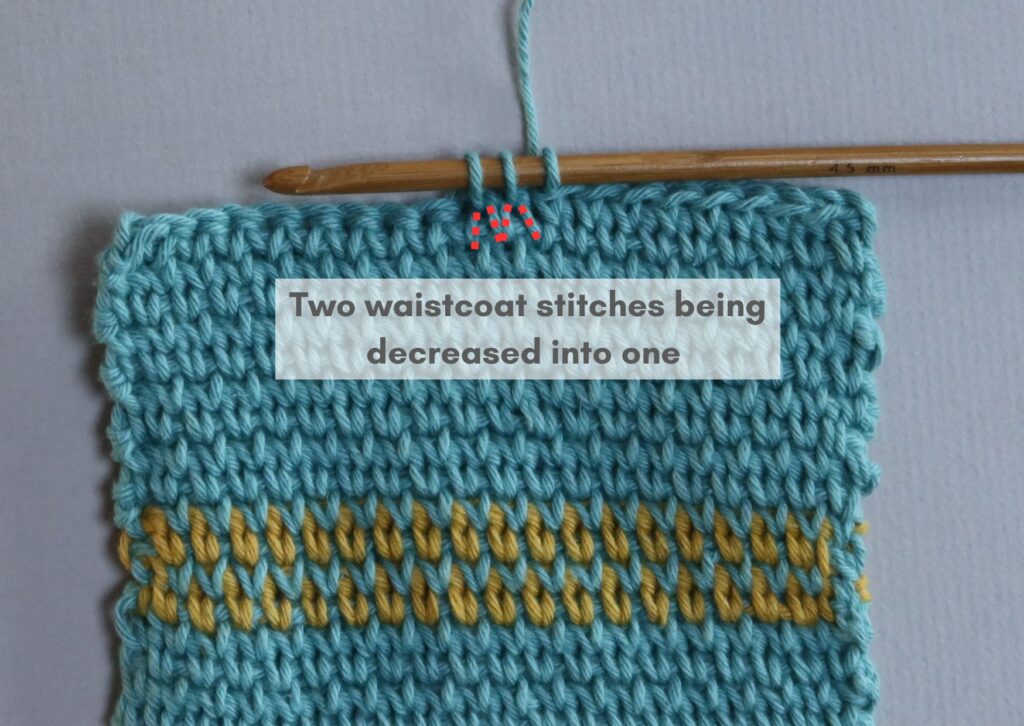
Waistcoat stitch decrease in rows: place hook through upside down V of first stitch, yarn around hook and pull up a loop (2 loops on hook), place hook through upside down V of next stitch and pull up a loop (3 loops on hook), yarn around hook and pull through all three loops.
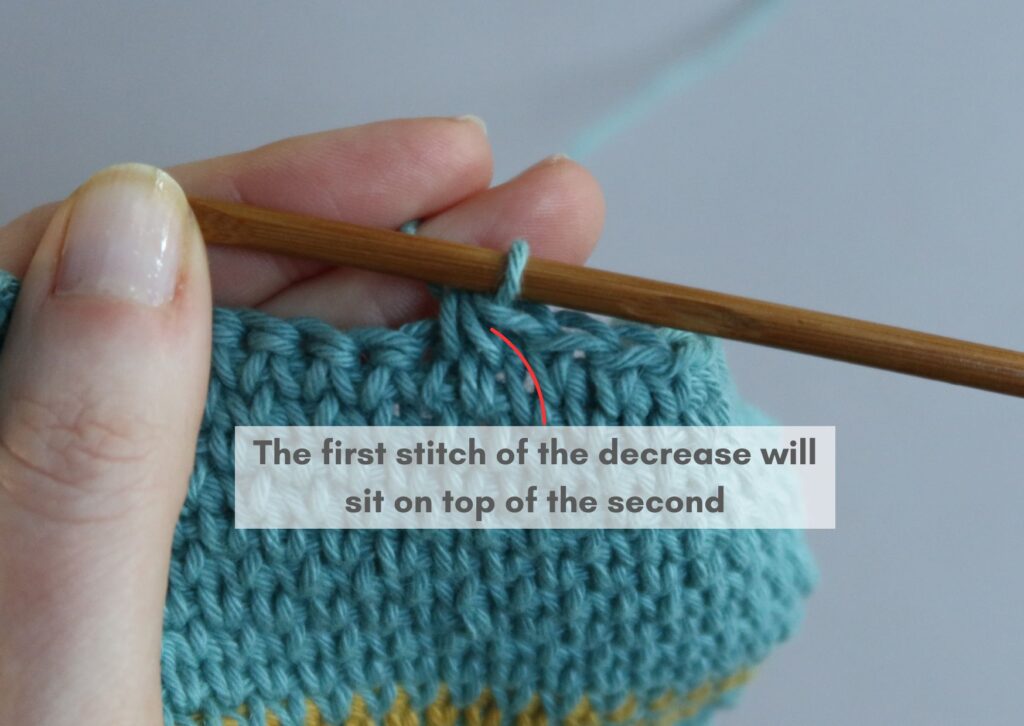
When working the decreased stitch in the next row, place the hook through the V of the first stitch that was decreased. This will help to hide the decrease and present it as one V.
How to do Colour-Work in Waistcoat Stitch
I have tried waistcoat stitch colour-work in rows and rounds and would suggest that it works best for projects crocheted in the round.
The stacking nature of the V stitches in the round make it easy to chart up designs that are well represented in the resulting crocheted fabric.
When worked in the round, the non-working yarn is easily carried or ‘trapped down and hidden on the inside for items such as hats, mittens or bags.
To see a video of how to change colours and trap down yarn floats for waistcoat stitch, just click here.
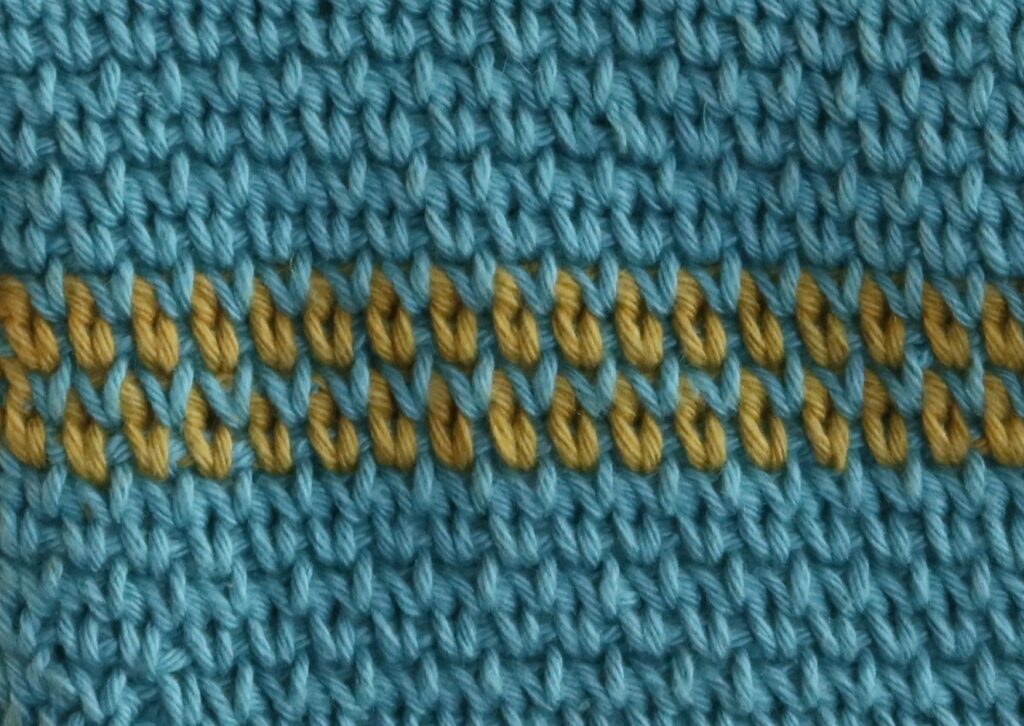
Waistcoat stitch colour-work crocheted in rows is never as neat because the Vs are displaced in a sort of brick formation rather than stacked. This means that more of the other colour is visible around the contrast colour and the yarn carried on the other side of the work is visible.
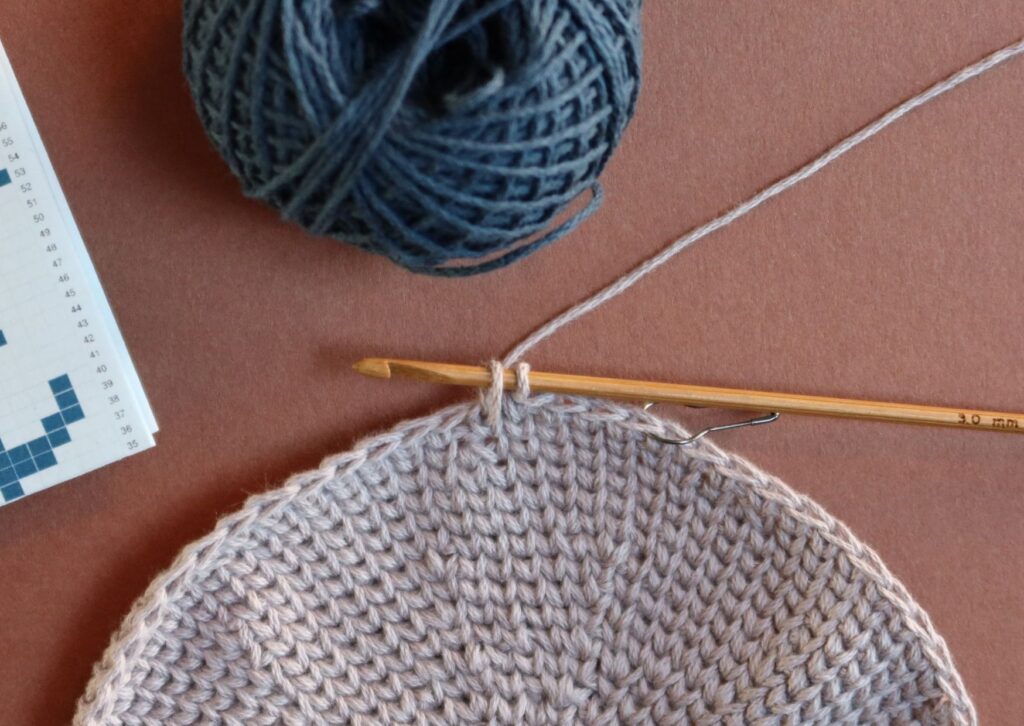
As with all colour changes in crochet, the changeover happens on the final yarn around hook, the stitch before the new colour is required. If you need a refresher on this, I have a tutorial on ‘How to Change Colour in Crochet Rows and Rounds‘.
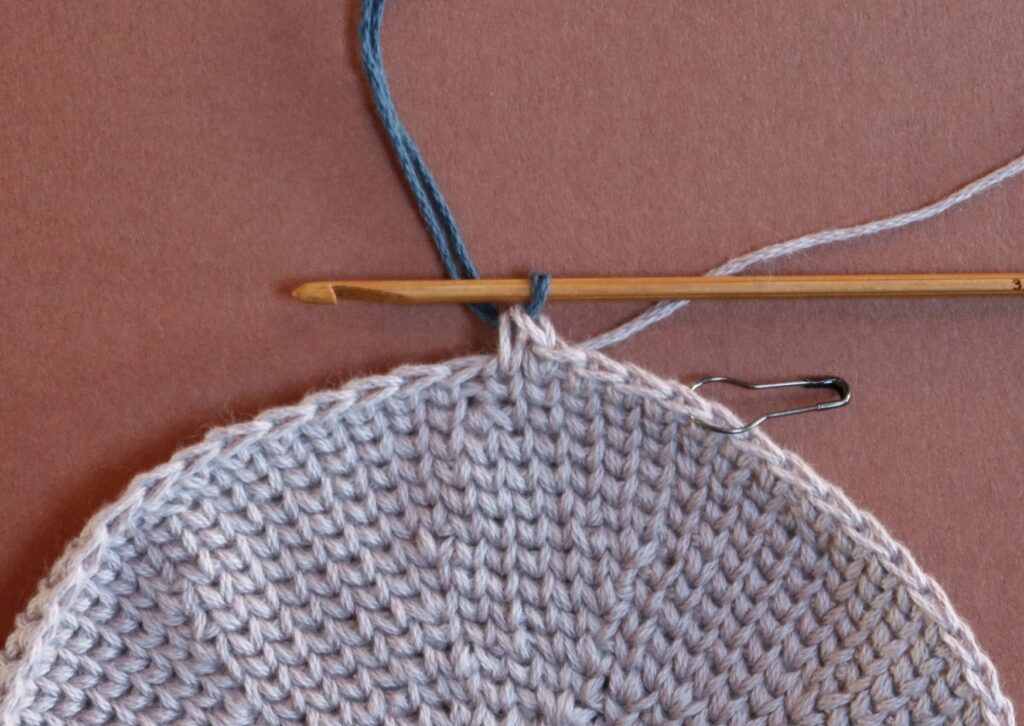
The chart I used for this sample requires 5wc in the main colour, 1wc in the contrast colour and then continues in the main colour.
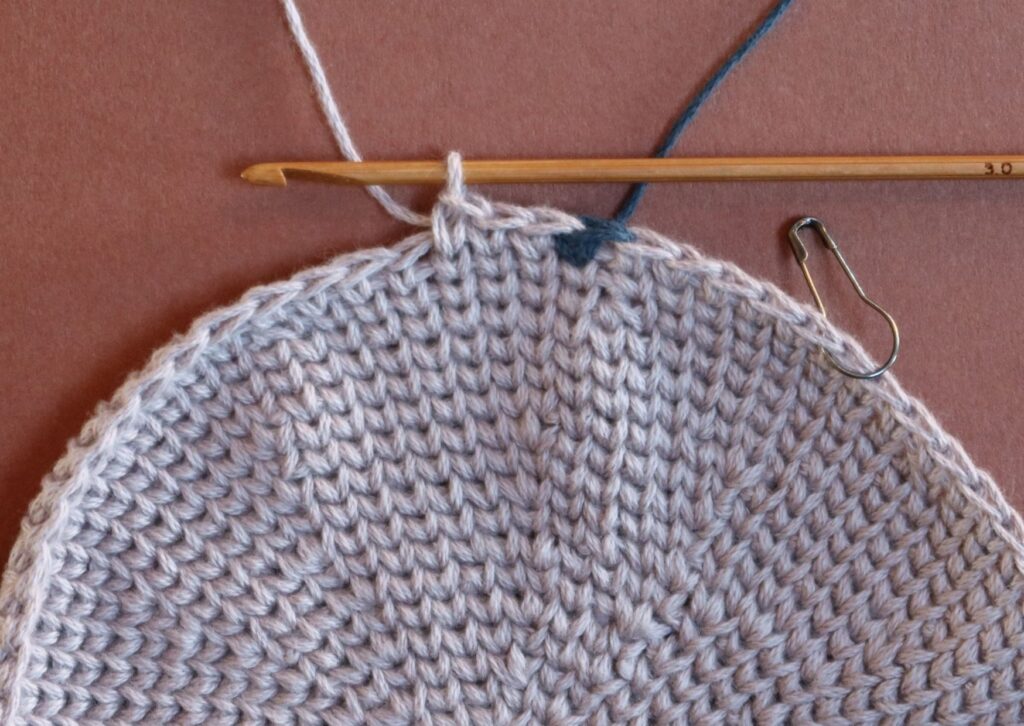
The colour change is always made on the final yarn around hook of the previous stitch. The waistcoat stitches are always worked into the V at the front, not the front and back loops at the top of the stitch.
Make sure you also read the next section on trapping down/ carrying yarns for colour-work.
Trapping down Yarns in Colour-work Waistcoat Stitch
Part of the success of colour-work project is how often you trap down or carry your non-working yarns and this is even more important with waistcoat stitch because the trapped yarn of the previous row is another strand of yarn to navigate your hook through when you work a stitch.
If the inside of your waistcoat stitch project is not going to be seen then I would recommend trapping down the non-working yarn every 4th stitch. This ensures that you don’t have long floats that could affect the tension of your final fabric. It also means there are fewer stitches with extra yarn to navigate.
If you are making something like a mitten or sleeve with waistcoat stitch then you may want to trap the yarn down every or every other stitch to make sure that fingers don’t get caught in the floats.
If the inside of your project is also going to be seen then trapping the non-working down every stitch is the best option to hide it as much as possible.
Here is how to trap down the non- working yarn so that it s carried on the wrong side until it is required.
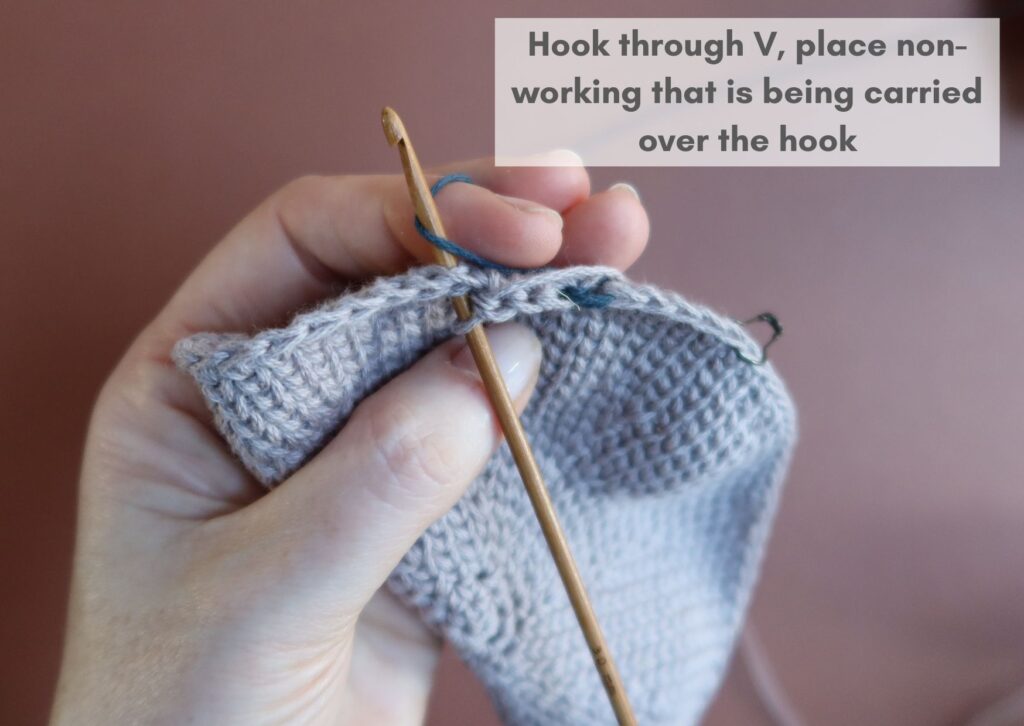
Step 1 – place the hook through the V, then place the non-working yarn over the top of the hook from right to left if you are right-handed or left to right if you are left-handed.
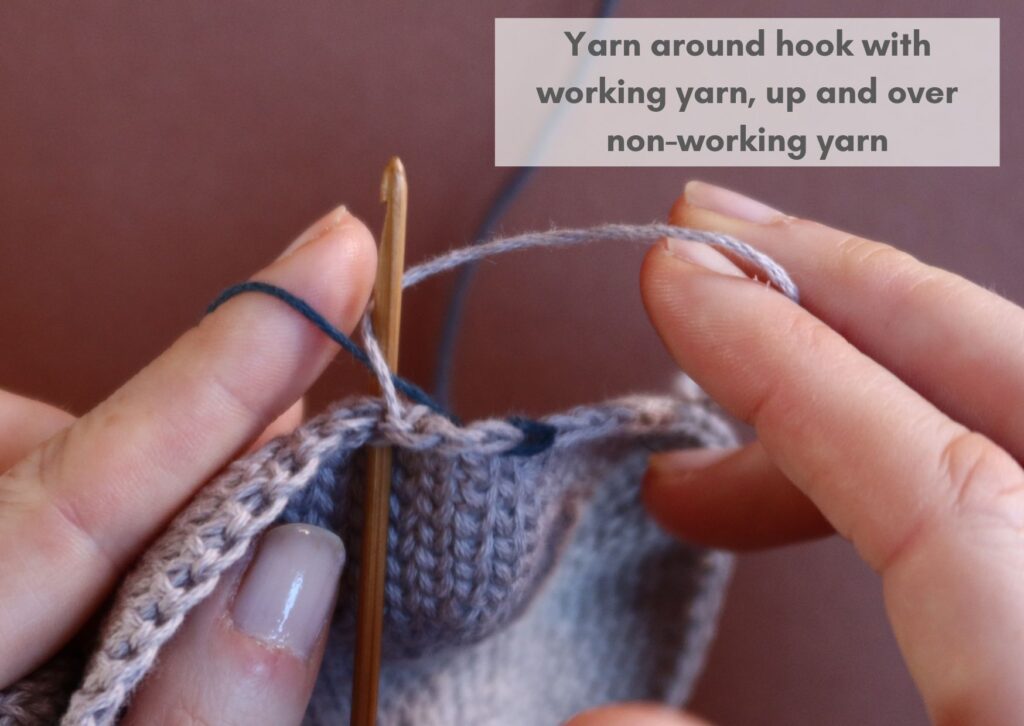
Step 2 – yarn around hook with the working yarn so that it is coming from above the non-working yarn.
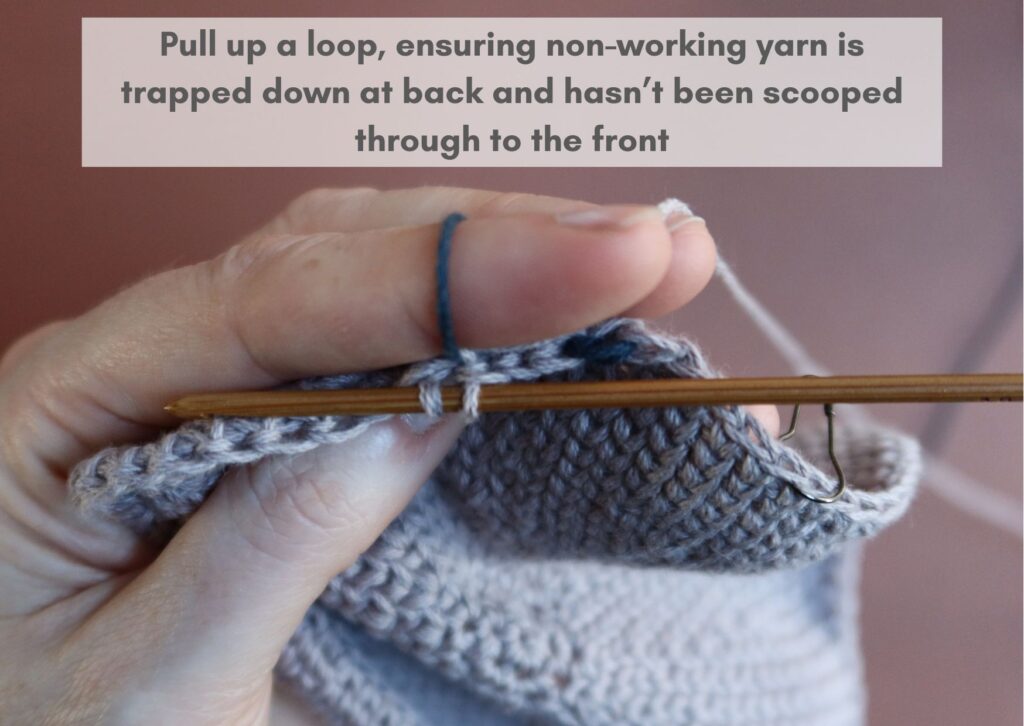
Step 3 – Pull up a loop, bringing hook from back to front with working yarn. When the hook is pulled through from back through to the front, it scoops under the non-working yarn securing it at the back of the stitch being crocheted.
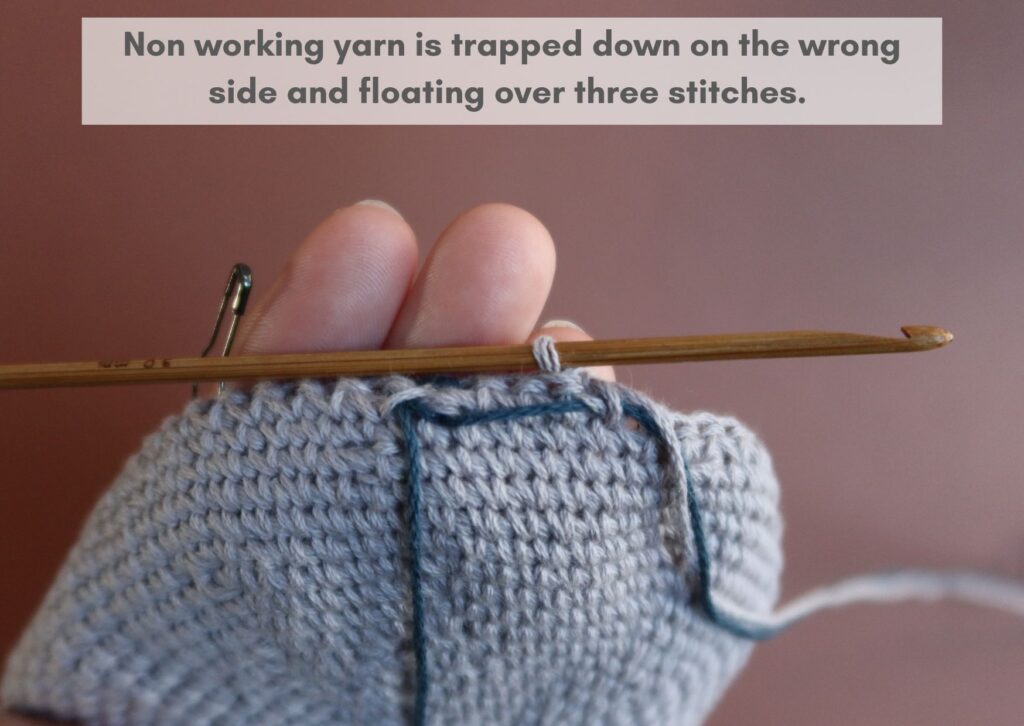
Step 4 – Check the wrong side to make sure the non-working yarn has been trapped down. The sample above was trapped down on the 4th stitch, so there is a float over 3 stitches.
Patterns that use Waistcoat Stitch


Let’s Be Social
Fancy staying in touch? I am usually found in these online places, or you can join my newsletter where I talk about all things yarn, crochet and knitting:
- Pinterest – FayDHDesigns
- YouTube – @faydhdesigns
- Instagram – @faydhdesigns
- Newsletter sign up


